Project Management Settings
September 26, 2024
plus
The Project Management Settings window is used to configure how projects are viewed, created, and maintained. These settings are used for all projects in Mango.
Accessing Project Management Settings
You can access Project Management from the menu.
- Click
 Project Management.
 - Click
 Dashboard.
 - Click the
 PM Settings button.
Using Project Management Settings
The Settings window is broken into six sections. You must click ✓ Save to save your changes.
Your Tags
The Your Tags section lists all of the tags you have created, as well as the two default tags Available for Work and Extended. The default tags cannot be edited or deleted.
Click + Add New Tag to add a new tag. Name the tag and optionally select a color by clicking in the box to the right of the tag name.

Company Template Library
The Company Template Library section lists all of the templates you have created or added from the Master Template Library and allows you to create projects for multiple clients at once.
To create projects for multiple clients at once, select the template and then click Duplicate to Clients. Enter the template information, select the clients to which you want to create projects, and then click the Clone Project button.
To delete one or more templates, select the template(s), click the drop-down arrow next to Duplicate to Clients and select Delete Selected Template(s).
Click the Master Template Library button to access the built-in templates and add them to your library. You cannot use these templates until you have added them to your library.
Click the + Create Project Template button or click on an existing project template to display the Create Template window where you can add or change a custom template that you can use repeatedly. The following settings are available.
- Project Template Name – Specify a name for the project template. This field can include wildcards for the day, month, quarter, or year. For additional information, see the Wildcards article. Click the
 (Show Wildcards Table for Guide) icon to see a list of available wildcards.
 - Billing Partner – Optionally select the staff member in charge of invoicing this project. Only active staff members can be assigned, but inactive staff may be preserved on existing projects.
- Manager – Optionally select the staff member assigned to manage this project. Only active staff members can be assigned, but inactive staff may be preserved on existing projects.
- Due Date – Optionally specify the date the project is to be completed by.
- Turnaround (Days) – Optionally specify the number of days needed for turnaround when completing the project.
- Repeat – If a Due Date is specified, optionally select how often the project will repeat (Yearly, Quarterly, Monthly, Semi-Monthly, Weekly, Bi-Weekly, Daily, or Custom). When Custom is selected, you can configure a more complex schedule based on a Daily, Weekly, Monthly, or Yearly period, the specific days, and how long it will repeat for. Click the
 (View Custom Rules) icon to edit the custom schedule.
 - Requires Final Review – Optionally set this check box to set the status of the project to Ready for Review when all tasks have been finished. A user with the Administrator role must finish the review for it to be marked complete. Clear this check box to allow the project to be completed without a review.
- Compute Task Due Date – Optionally set this check box to add an Offset Days column to the task list. The Due Date for each task will be calculated by using the Due Date for the project and subtracting the Offset Days for each task from last to first. Clear this check box to only used Due Dates specified.
- Complete Tasks in Order – Optionally set this check box to require each task to be completed before the next task is the list can be completed. Clear this check box to allow tasks to be completed in any order.
- Previous Period/Year Policy – Optionally set this check box to cause wildcards to populate for the prior period instead of the current one. For example, a Project Template Name containing ^M will populate the previous month (e.g., September instead of October, if it is currently October) when this check box is selected. Clear this check box to use the current period.
- Project Memo – Optionally specify additional information about the project. You can type @ (ampersand) to choose a Shortcut to add to the memo. Information about Shortcuts can be found in the Shortcut Codes article.

Email Notifications
The Email Notifications section provides a way to get notifications when projects or tasks are assigned, a task is ready to be worked on, or when the status of a project changes. The following settings are available.
- Notify when a Project is assigned – Set this check box to send an email notification to the Manager and Billing Partner when they are assigned to a project.
- Notify when a task is assigned – Set this check box to send an email notification to the Assigned User when they are assigned to a task.
- Notify when a TASK is ready to be worked on – Set this check box to send an email notification to the Assigned User when the previous task is complete. This is useful when the Complete Tasks in Order option is used.
- Notify Manager when a Project is ‘ready for review’ – Set this check box to send an email notification to the Manager when the status of the project is changed to Ready for Review to begin the review process.
- Notify Manager when a Project status is ‘In Progress’ – Set this check box to send an email notification to the Manager when the status of the project is changed to In Progress during the review process.
- Notify Manager when a Project is ‘Rejected’ – Set this check box to send an email notification to the Manager when the status of the project is changed to Rejected during the review process.

Email Alerts
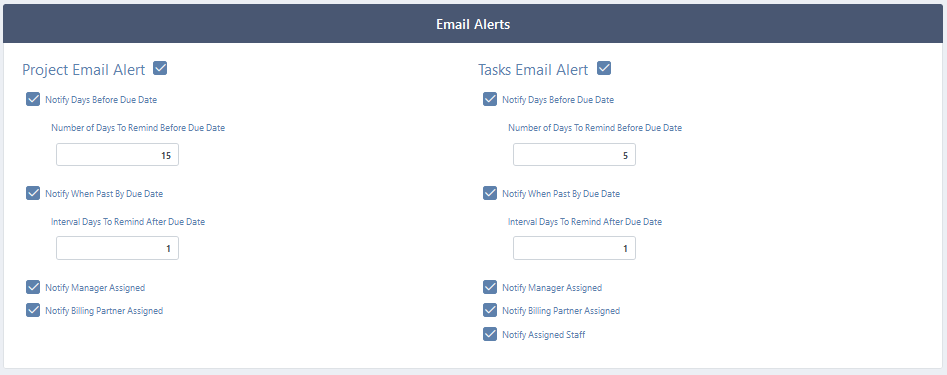
The Email Alerts section provides a way to get notifications when project or task due dates are approaching or have passed. Who is to be notified can also be specified. The following settings are available:
- Project Email Alert – Set this check box to enable email notifications for projects. Clear this check box to disable these alerts.
- Notify Days Before Due Date – Set this check box to send an email notification to the Manager and/or Billing Partner the number of days specified in the Number of Days to Remind Before Due Date field prior to the due date unless the project is complete.
- Notify When Past By Due Date – Set this check box to send an email notification to the Manager and/or Billing Partner every number of days specified in the Interval Days To Remind After Due Date field after the due date until the project is complete.
- Notify Manager Assigned – Set this check box to send email alerts to the Manager assigned to the project.
- Notify Billing Partner Assigned – Set this check box to send email alerts to the Billing Partner assigned to the project.
- Task Email Alert – Set this check box to enable email notifications for tasks. Clear this check box to disable these alerts.
- Notify Days Before Due Date – Set this check box to send an email notification to the Manager and/or Billing Partner the number of days specified in the Number of Days to Remind Before Due Date field prior to the due date unless the task is complete.
- Notify When Past By Due Date – Set this check box to send an email notification to the Manager and/or Billing Partner every number of days specified in the Interval Days To Remind After Due Date field after the due date until the task is complete.
- Notify Manager Assigned – Set this check box to send email alerts to the Manager assigned to the project containing the task.
- Notify Billing Partner Assigned – Set this check box to send email alerts to the Billing Partner assigned to the project containing the task.
- Notify Assigned Staff – Set this check box to send email alerts to the Assigned User for the task.

Budgets
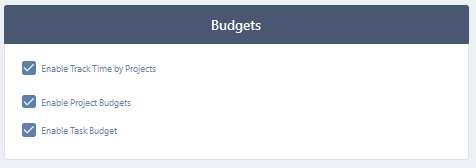
The Budgets section allows you to track time by project and to enable project budgets. The following settings are available:
- Enable Track Time by Projects – Set this check box to enable the + Time option in the More Options list of the Project Details window, and enable the
 (Add Timer) icon in the Project Tasks. Clear this check box to hide these options.
 - Enable Capacity Planning – Set this check box to enable the Capacity Planning feature. This requires the Enable Project Budgets and Enable Task Budgets check boxes to be selected. For additional information, see the Capacity Planning article.
- Enable Project Budgets – Set this check box to enable the Budgets option in the More Options list of the Project Details window.
- Enable Task Budget – If Enable Project Budgets is enabled, set this check box to require the task budget option in the Budgets window to be selected. Clear this option to allow the task budget option to be selected or cleared in the Budgets window when configuring a budget.
Additional information on Project Budgets can be found in the Budgeting for Projects article.

Other Settings
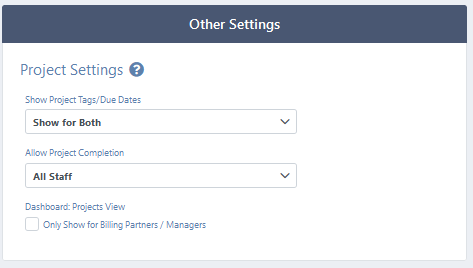
The Other Settings section allows you to specify who to show project tags for, who to allow project completion to be set by, and who can see the Dashboard Projects View. The following settings are available:
- Show Project Tags/Due Dates – Select if tags and due dates should Show for Managers Only, Show for Partners Only, or Show for Both.
- Allow Project Completion – Select if projects can be completed by Admin Only, Admin/Manager Only, All Staff.
- Only Show for Billing Partners / Managers – Set this check box to hide Projects view on the Project Management Dashboard except for users who are assigned as Billing Partners and/or Managers in a project. For other users, the View field on the Dashboard will default to Tasks, limiting them to only see tasks they have been assigned.

Common Questions about Project Management Settings
- How can I customize a project template for another engagement type?
- You can customize a template while you are cloning/duplicating the project to clients.
-
- Click Project Management.
- Click Dashboard.
- Click the PM Settings button.
- In the Company Template Library, select the project template.
- Click the Duplicate to Clients button.
- Make any changes to the template as needed. (Note: Changing the Engagement Type will automatically filter the client list to match.)
- Select the client(s) to create new projects for.
- Click the Clone Project button.
To see this process in action, see the following Learning Center video.
-