Help Center
Expense Entry
June 12, 2024
all plans
Expenses are costs incurred by your firm on behalf of a customer. Expenses can include photocopies, postage, mileage, filing fees, and more. You can enter expenses into Mango so that they can be billed out to your clients.
Accessing Expense Entry
There are three ways to add expenses: Quick Links, Time Sheet Entry, and Expense Manager.
Adding via Quick Links
- Click
 Quick Links.
 - Click Expense Entry.
Adding via Time Sheet Entry
- Click
 Time & Expense.
 - Click
 Time Sheet Entry.
 - Click the + Expense
Adding via the Expense Manager
- Click
 Time & Expense.
 - Click
 Expense Manager.
 - Click the + Add
Adding an Expense
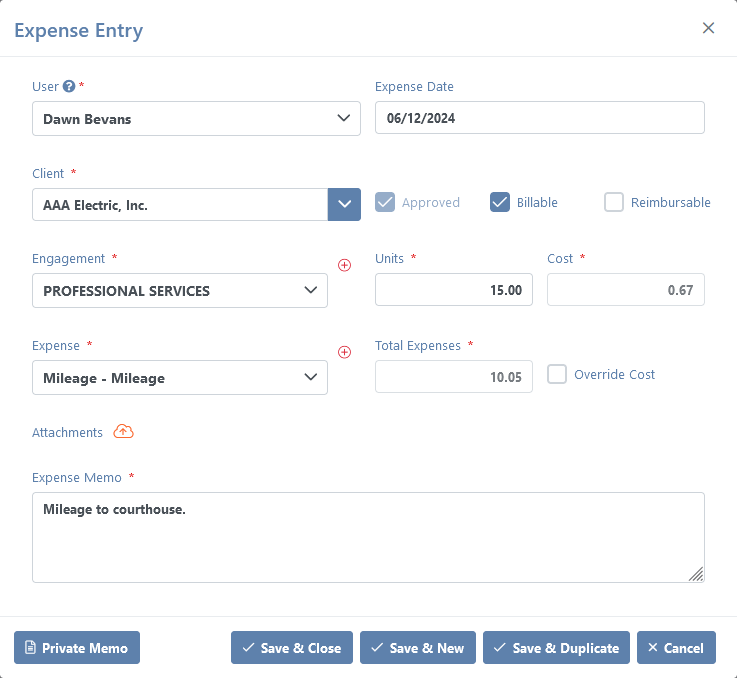
To enter an expense
- Open Expense Entry.
- The User and Expense Date fields will automatically be filled in with the currently logged in user and today’s date.
- Select the Client. Additional information about clients can be found in the Overview of Clients and Engagements topic.
- Approved is automatically selected if Auto Approve Expenses is selected in the Time & Expenses Settings, otherwise this check box is cleared. Additional information about the Auto Approve Expenses option can be found in the Overview of General Settings topic.
- The Billable check box is automatically selected. Clear this check box if the expense is non-billable.
- You can optionally select the Reimbursable check box. This indicates that the expense was paid for by someone at the firm, and must be reimbursed.
- Select the Engagement and Expense. (Note: You can add a new Engagement or Expense by clicking the
 (Add) button next to the field.)
 - Enter the number of Units. The Total Expenses will automatically be updated based on the Cost. If Cost is 0.00, or you want a different Cost, you can select the Override Cost check box and then enter a new amount for the Cost.
- Optionally add one or more Attachments, such as a receipt, by clicking the
 (Attach Files) button.
 - Expense Memo is automatically populated based on the Expense Text in this field will be included on the invoice. You can optionally update this field. Shortcuts can be used.
- Optionally add a
 Private Memo. Text in this field will not be included on an invoice.
Once the expense has been entered, you have three options to save.
- Click ✓ Save & Close to save the expense and close the window.
- Click ✓ Save & New to save the expense and clear all fields so that you can enter a brand new expense.
- Click ✓ Save & Duplicate to save the expense and does not clear the fields so that you can enter a similar expense without reselecting/retyping information.

Once entered, you can review expenses in the Expense Manager or Time Sheet Entry windows. For additional information, see the Expense Manager and Time Sheet Entry articles.