
Recurring Invoice
July 18, 2024
all plans
Recurring Invoices are primarily used when you want to send an invoice to your clients with the same amount and same activity based on a frequency (e.g., monthly, quarterly, annually, etc.). It is designed to allow for recurring invoicing with or without time records. Existing time and expenses can optionally be pulled into the Recurring Invoice to be written up or down.
Accessing Recurring Invoice
You can access Recurring Invoice from the menu.
- Click
 Billing & Invoicing.
 - Click
 Recurring Invoice.
Using the Recurring Invoice Window
At the top of the window, there are buttons to + Add Recurring Invoice, Process Invoices, add an ![]() Invoice Message, and add
Invoice Message, and add ![]() Filters.
Filters.
Note: By default, a filter with a Bill Through Date of the current system date and the Include Bill Through Date on Invoice check box selected is used. To change either of these settings, click Filters.

The Recurring Invoice window is divided into a navigator to specify overall options, and a list of recurring invoices.
Recurring Invoice Navigator
Enter an Invoice Date and select your wildcard settings. The Month, Quarter, and Year fields are wildcards that will be used in the Invoice Description, if applicable.

Recurring Invoice List
The Global Search field can be used to locate records containing specific text. Once specified, an indicator will be displayed showing how many records contain that text. To clear the search, click the red X icon to the right of the field.
The Filters button can be used to limit the List based on the Bill Through Date, Billing Parter, Client Group(s), and/or Invoice Group. Select the filter options and click Fetch to apply the filter. To remove the filter, click Reset.
Some columns in the List are optional. The Choose Columns field allows you to optionally select or clear the Rows, Retainer, Company Location, Billing Partner, and Billing Group check boxes, which will display or hide these columns.
Client Name, Invoice Group, Memo Description, and Scheduled Date are required fields. Invoice Groups can be added via the Lists tab in General Settings. For additional information, see the List Settings article. The Memo Description field defaults to the row above. You can type @ (ampersand) to choose a Shortcut to add to the memo. Information about Shortcuts can be found in the Shortcut Codes article. The Invoice Amount field is populated once one or more engagements have been added.
You can click on the header of many columns to sort the records shown by the values in that column. Click the header again to reverse the sort.
Finally, totals are included below the list. This includes total Invoice Amounts and total Sales Tax.

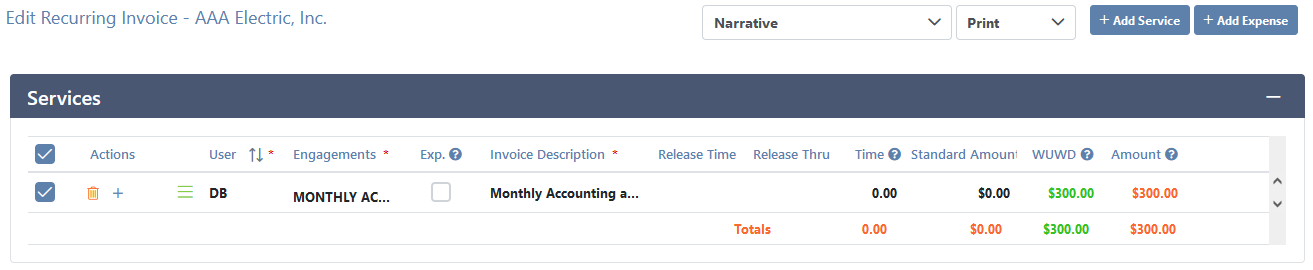
Edit Recurring Invoice Window
The Edit Recurring Invoice window is displayed when clicking ✓ to save a new row in the Recurring Invoice window, or when clicking  (Add/Edit Engagements to Invoice and Narrative Invoice Line Items) on an existing row.
Select an Invoice template and Finalize action for the invoice.
Click + Add Service or + Add Expense to add a row to the invoice.
Click  (Delete) to delete the row, or click
  (Add Row) to add a new row.
User, Engagements, and Invoice Description are required fields and can be edited by clicking in the field.
The Exp. column check box can be selected if you do not want expenses to show as a separate line item on the invoice, but to roll them into the billed time amount.
Select the Release Time check box to include time with the same engagement type on the invoice. Release Time is not available if the Recurring Invoice is marked as a Retainer. When Release Time is selected, click (View Time Records) to display the Open Time Records window, where you select time records that are associated with a service. The Open Time Records window is similar to the Time Sheet; however, it is limited to a specific engagement.
The Release Thru column represents the date through which unbilled time and expenses should be included on the invoice. This field can be edited.
The Time column is available if Release Time is selected and represents the number of unbilled hours or units that are to be included on the invoice.
The Standard Amount column is available if Release Time is selected and represents the amount of unbilled time or expenses that are to be included on the invoice.
The WUWD column is available if Release Time is selected and represents the write up/write down amount between the Standard Amount and the Amount fields.
The Amount column represents the total amount to be billed on the invoice.
Adding a Recurring Invoice
- Open Recurring Invoice.
- Click + Add Recurring Invoice to add a row to the Recurring Invoices section. When adding a recurring invoice, the row is added to the bottom of the list.
- Specify a Client Name, Invoice Group, Memo Description, and Scheduled Date.
- Specify any other fields as needed.
- Click ✓ to save the row and open the Edit Recurring Invoice window to add your engagement(s).
- Click + Add Service or + Add Expense.
- Specify the User Engagement, and Invoice Description
- Specify any other fields as needed.
- Click ✓ to save the row.
- Repeat steps a – d as needed.
- Close the window.
Editing a Recurring Invoice
To change existing recurring invoices in the Recurring Invoice list, a few different options are available.
You can click in the Client Name, Invoice Group, Memo Description, Frequency, or Schedule Date columns to edit the contents inline. Simply update the contents of the field and then press Enter.
The Actions column provides options to perform an action on a specific entry.
- Click the (Add/Edit Engagements to Invoice and Narrative Invoice Line Items) icon to display the Edit Recurring Invoice window for the selected row.
- Click the (Delete) icon to delete the current record. You will be prompted to confirm the action.
- Click the
 (Preview) icon to preview an invoice for the current record
 - Click the (Add Row) icon to add a recurring invoice.
If you have MangoPayments, you also have the option to click ![]() (Create Scheduled Payments),
(Create Scheduled Payments), ![]() (Edit Scheduled Payments), and
(Edit Scheduled Payments), and ![]() (Show Schedule Payments History). When creating a scheduled payment, select the desired Payment Type and select a Count, which determines how many times to bill your client, or select Never Ends Until Cancelled if you want the client to be continuously billed until you cancel the recurring payment. Click + Create Schedule when you are finished.
(Show Schedule Payments History). When creating a scheduled payment, select the desired Payment Type and select a Count, which determines how many times to bill your client, or select Never Ends Until Cancelled if you want the client to be continuously billed until you cancel the recurring payment. Click + Create Schedule when you are finished.
Finally, you can select one or more records in the List to display the Batch Options. These options will perform actions on all selected records.
- Click
 Delete Selected Items to delete all selected recurring invoice(s). You will be prompted to confirm the action.
 - Click
 Batch Update Projects to update the update the Scheduled Date, Release Date, Memo Description, Invoice Group, Frequency, Invoice Template, and/or Finalize Action for all selected recurring invoice(s).
 - Click the
 Invoice Message button to override the Standard Message, Top Memo, and Footer Message for invoices in the selected recurring invoice(s).
 - Click the Process Invoices button to create the next invoice in the series for the selected recurring invoice(s).
Processing a Recurring Invoice
- Open Recurring Invoice.
- Select the invoice(s) you want to process.
- Click Process Invoices.
Once the invoices are processed, open Invoice Review to finalize your invoices.
Common Questions About Recurring Invoice
The following are some frequently asked questions about Recurring Invoice in Mango.
- When trying to select a recurring invoice, I get a message “Error! Cannot process this row because it has 0 selected items.” Why is this?
- This error means there are no service or expense rows in the recurring invoice. Click (Add/Edit Engagements to Invoice and Narrative Invoice Line Items) and add one or more service or expense rows to the recurring invoice. You can then select the recurring invoice to process it or run batch actions.
See It in Action