
Requesting E-signatures
November 26, 2024
MangoShare works with AssureSign to allow you to request electronic signatures of your documents, quickly and securely. You can send and receive signed documents via email, without requiring users to scan their signed copies, or waiting for documents to be delivered. Simply email a request to the client or other party, they can click to securely sign it, and it is returned to you seamlessly.
Sending a Signature Request
You can send a request for a signature from throughout MangoShare, anywhere where a file is accessible.
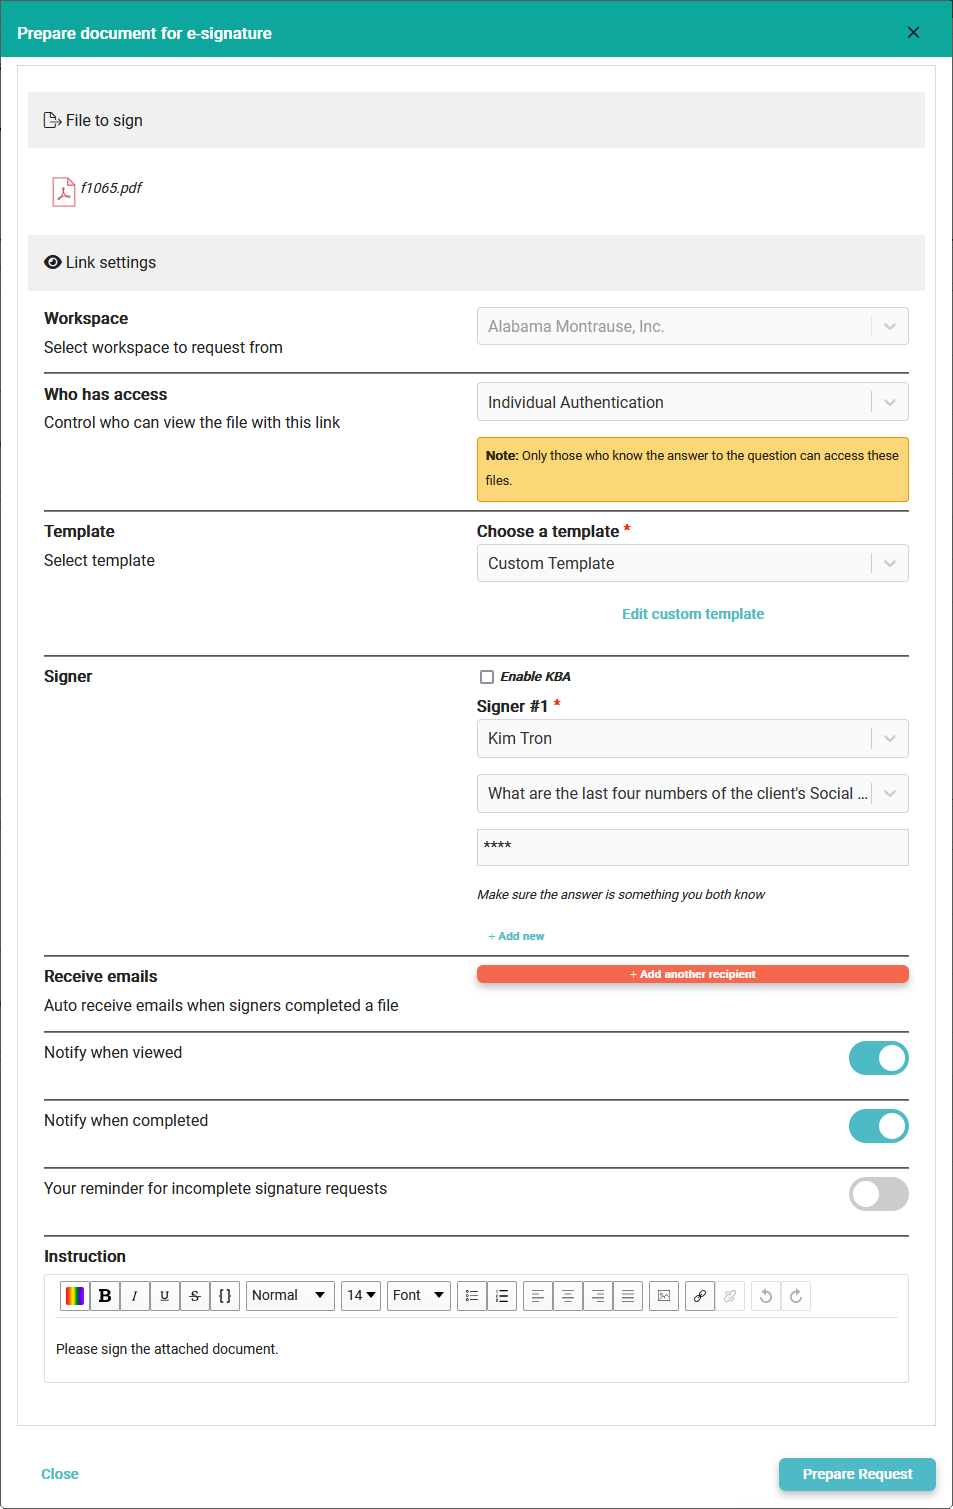
The Request Signature option is used to request a client or other party electronically sign a document. The recipient is provided a secure link to a PDF document, creates an electronic signature and digitally signs the document, and then the document is returned to the MangoShare server.
To send a signature request
- Click the New Link button, and then click Request signature.
- Select the Workspace for the request. If this request is not related to a client, you can select the General Files or Staff Files workspace. When making this request from a specific workspace, this field will be disabled.
- Specify Who has access to the file (Direct Link, Question / Answer, or Individual Authentication). The default value for this field depends on the Default Authentication Scheme for Links option on the Advanced Settings tab of Firm Settings. This field may be disabled if the Allow Users to change default authentication scheme option is disabled on the Advanced Settings tab of Firm Settings.
- If Question/Answer is selected, select a Question and enter a Shared answer. The list of questions for the Question/Answer option can be configured on the Advanced Settings tab of Firm Settings.
- If Individual Authentication is selected, the secret question associated with the client and each contact is used. The Secret Question for a client can be configured on the Overview tab of the Workspace Detail, and the Secret Question for a contact can be configured on the Personal Info tab of the Contact pane. For additional information, see the Advanced Settings, Workspace Detail, and Contacts articles.
- In the Template field, select Custom Template or, if defined, one of the reusable templates. Reusable templates are configured in AssureSign for specific forms. For more information, see the AssureSign Setup and Template Creation article. If selecting a Custom Template, the Template Creation window will be shown.
- Select each signer, as defined in the template. If the signer information does not exist as a contact, click Add new and enter their name and email address.
- To select who the email is sent on behalf of, and who will receive any notifications, select a staff member to Receive Emails.
- Enter any additional message in the Instruction field.
- Click Prepare Request. A link will be generated and email messages will be sent to each signer automatically.
Note: The Request signature option will be disabled if you do not have Access E-Signature permissions. For additional information, see the Staff Members article.
Note: Only PDF (Adobe Portable Document Format) documents can be used to add signature templates using MangoShare. Selecting a Word document (DOC, DOCX, or DOCM file) when requesting a signature will automatically convert the file to a PDF. Requesting signatures for any other type of document is not supported.
Tip: Using a Timestamp jotblock instead of a Date jotblock will include the date and time that the document was signed, without the recipient needing to specify the date.
Template Creation
When selecting a Custom Template, the template creation window will be shown.
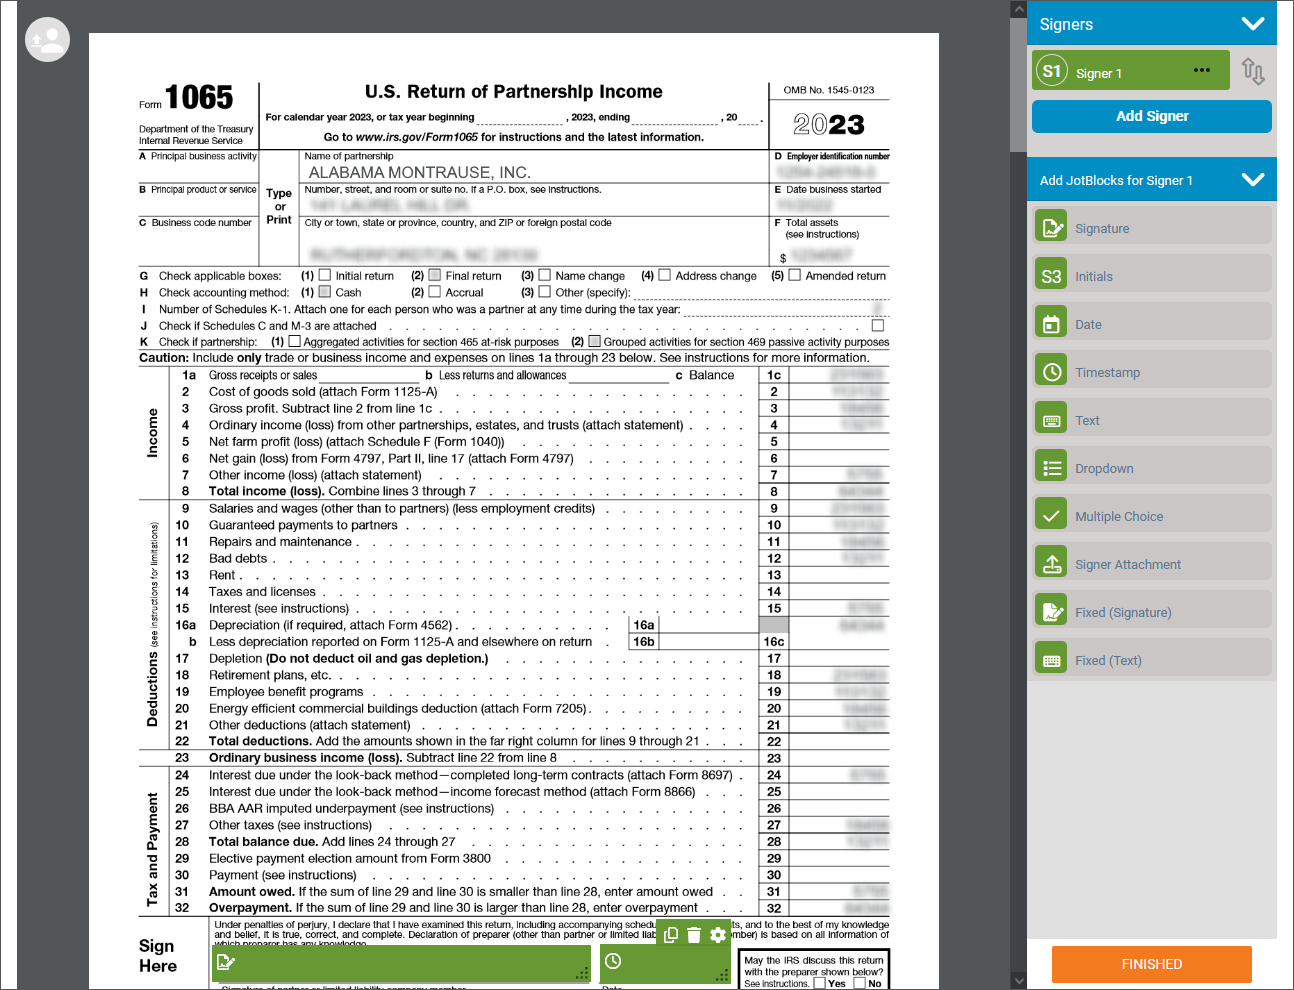
From here, you can add Jotblocks to indicate where signature information is needed on the document. Use the following steps to create a template:
- Under the group for the signer (e.g., “Add Jotblocks for Signer 1”), locate the needed signature block (e.g., Signature).
- Drag the signature block to the location in the document.
- Resize the signature block if needed.
- Repeat Steps 1-3 for each additional field.
- If an additional signer is needed, in the Signers group click the Add Signer
- Repeat steps 1-5 for each additional signer.
- Click Finished to return to the Request eSignature page.
Multiple signers
When multiple signers are selected for a template, an additional field is shown. In the Signers can sign field, select In any order if signatures can be added as they are available, or In the displayed order if signatures must be added in the order they are listed.
A notification will be sent to all signers when a document is first uploaded.
When “In the displayed order” is selected, each signer will receive an email when it is their turn to sign the document. If a recipient attempts to sign a document early, a message will be displayed:
“This document requires signatures from multiple signers in a specific order. You will be able to access and sign this document once signing is completed by other signers.”
Note: If two signers share an email address, an additional step may be necessary. See the Commonly Asked Questions, below.
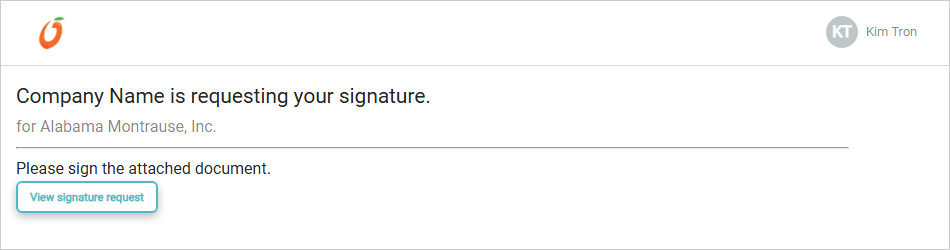
Accessing a Signature Request
Recipients will receive an email with a MangoShare link. After clicking the link, a file link recipient opens a page allowing them to electronically sign the document. This page is similar to the portal; however, unlike the portal, a recipient does not need to log in and does not have access to any other files or pages. They only have access to the file directly related to the request.
Enter Your Name
The recipient will be prompted to enter their name. Once entered, click Done.
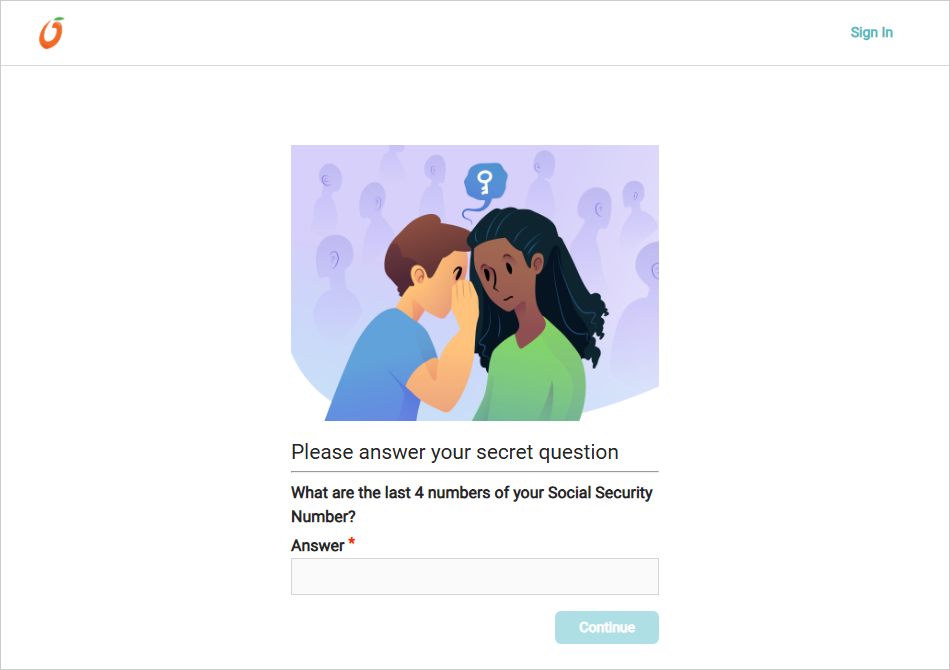
Secret Question
When using the Secret Question link option, the recipient will be prompted to enter the Answer to the selected question. Once entered, click Continue.
Apply Signature
When opening a signature request link, the document to sign will be shown. Recipients will complete the signature wizard to complete the signature, which will create a signed copy of the document on the MangoShare servers.
To complete an electronic signature request
- The recipient will be prompted to enter their email address to continue. Once entered, click Done to begin the signature wizard.
- Click View signature request.
- Recipients must click the terms and conditions link, agree to the terms, and then click Start signing.
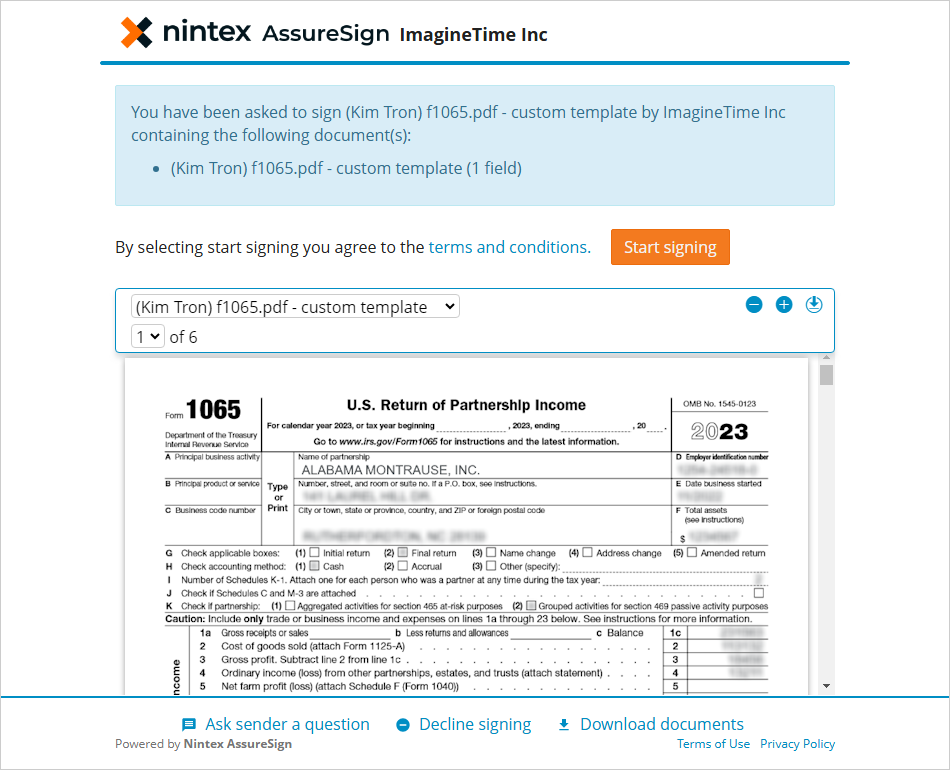
- Each jotblock for the signer will be shown as separate fields to complete:
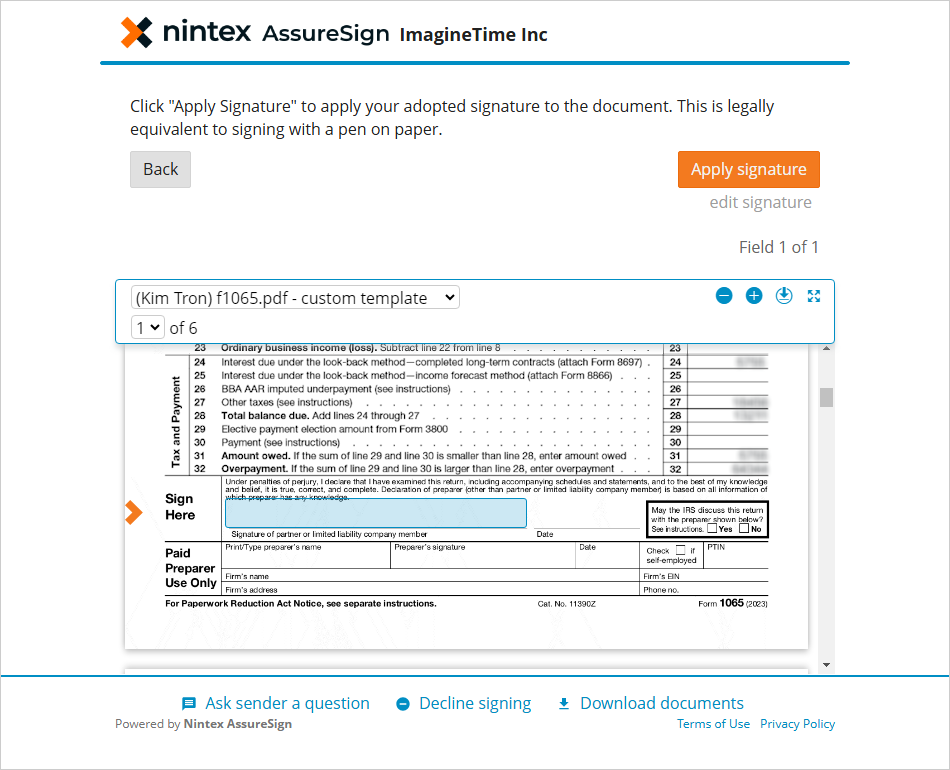
- To specify their signature, recipients will either type their name with a keyboard or draw their signature with a mouse or touchscreen. Once accepted, this will replace the signature jotblock in the template. Click Apply Signature to continue.
- To specify any other jotblock, recipients will type the value. Once entered, click Apply Signature.
- After all signature fields have been entered, click Finish to complete the document signing process.
- Optionally click Download documents to save a copy of the signed document.
After all signers have added their signature, a link to the completed document will be emailed to each party and the signed file will be stored in the client’s workspace.
Common Questions About Requesting E-signatures
- What is Nintex AssureSign?
- MangoShare uses AssureSign® by Nintex to automate the electronic signature process. AssureSign uses configurable templates to place “jotblocks” where variables will appear in a PDF document. Then, when a signer enters the value for the field (including the date or their handwritten signature image), this is inserted into the document along with the PKI information associated with the information, allowing it to be used as a legal signature.
Additional information about AssureSign can be found in the AssureSign Setup and Template Creation article.
- What document types can we send or request?
- Although any type of file can be sent to or requested from your client, only PDF files can be sent for electronic signatures. Selecting a Word document (DOC, DOCX, or DOCM file) when requesting a signature will automatically convert the file to a PDF.Can we create a reusable template for signature requests?Although you can create a custom template as needed, it can be useful to create a template that you can reuse several times for standard forms. To create a reusable template, sign into the AssureSign website with the account linked to your MangoShare account. Additional information about creating reusable signature templates can be found in the AssureSign Setup and Template Creation article.Can we send a document to multiple recipients for signatures?Yes; documents in MangoShare are only considered “signed” after all parties have added their electronic signature.How many signatures can I request?AssureSign provides a number of “envelopes” per MangoShare account. These envelopes are pooled and can be used by any member of the MangoShare account.Can we get additional envelopes if we use more than expected?Envelopes are sold in batches of 200, generally as part of your monthly subscription. If you need additional envelopes, there is a small charge per additional envelope used that month (about $2/envelope).What is an envelope?An “envelope” refers to one signed document, regardless of the number of signature lines. For example, an accountant needs a client and a related party to sign a document. The given document has 15 places where the various parties need to sign. The document as a whole is considered one envelope.
- A client wants to receive notifications as soon as new files are available. Can MangoShare do this?
- Yes, contacts associated to a client workspace can optionally receive notifications when a file is uploaded, viewed, downloaded, or commented on. To add a contact to a client in MangoShare, use the following steps:
- Click Workspaces.
- Click the name of the client.
- On the Contacts tab, click Add Contacts.
- Enter the Email Address and Full Name of the contact.
- Optionally Add a Personal Note to the invitation email.
- Click Invite contact.
- On the Notifications tab, enable or disable the desired options in the Contacts will receive a notification when you
To change notifications sent to an existing contact, click the Notifications tab in Workspaces, then enable or disable the desired options in the Contacts will receive a notification when you section.
- Can I get notifications when my client interacts with a file in MangoShare?
- Yes, assigned staff can optionally receive notifications when a file is uploaded, viewed, downloaded, commented on, or signed by a contact. To assign staff to a client in MangoShare, use the following steps:
- Click Workspaces.
- Click the name of the client.
- On the Assigned Staff tab, click Assign staff members.
- Select your name and any other staff members who should receive notifications for this client, and then click Next.
- Enable or disable the desired options in the Assigned staffs will receive a notification when contacts section, and then click Continue assigning.
To change notifications sent to a currently assigned staff member, click the Notifications tab in Workspaces, then enable or disable the desired options in the You will receive a notification when you section.
- My client did not receive the request from MangoShare, or it was marked as spam. What can we do to prevent this?
- Occasionally, email messages coming from MangoShare are incorrectly marked as spam. To make sure they are delivered, have your clients whitelist “no-reply@MangoShare.io” in their email application. Use the following steps to do this using Microsoft Outlook:
- Right-click in your email list, point to Junk, and select Junk E-mail Options.
- On the Safe Senders tab, click Add.
- Enter “no-reply@MangoShare.io” and click OK.
- Click OK to close the Junk Email Options window.
If they use another email application, or if their email is filtered by their service, they may need to contact their email provider for steps to whitelist email addresses.
- Two individuals share an email address, but want to receive separate emails for their signature requests. How can we send multiple messages to the same email address?
- MangoShare can send multiple email messages to the same email address by adding a comment to the second email address to differentiate the recipients. A comment is added in parentheses prior to the at sign (@), using this format:
- email(comment)@address.ext
For example, if John and Mary Williams both use the email address williams2000@email.com, when specifying their email addresses you might use:
- williams2000@email.com
- williams2000(Mary)@email.com
Note: A maximum of two signers can share an email address per signature request. The first listed email address must be valid, without a comment, for the secondary address to be used.
- One of our signatories requested a Certificate of Completion for a signed document. Can we provide this?
- Yes, AssureSign allows you to generate a Completion Report, which can be printed and provided as needed (e.g., to show a court that a signature was received). To generate a Completion Report, use the following steps:
- Sign into the AssureSign website with the account linked to your MangoShare account.
- Click View reports.
- Click Document Search.
- Enter a date range (or perform an Advanced Search) to locate the signed document, then click the Document Name.
- Under Document Tasks, click View completion report.
- Print the report or save it to a PDF file.
Additional information about AssureSign can be found in the AssureSign Setup and Template Creation article.
- I received the message “JavaScript Alert – There was a problem creating the shareLink.” What does this mean?
- This message can be shown when sending a Request Signature link using a Question/Answer, but no Shared answer is specified. Attempt to send the request again with a valid answer. If this issue persists, contact MangoShare Support.One of our recipients received the message, “Whoops! This link is expired.” What does this mean?This message can occur when a recipient clicks on a file link, but the Workspace in MangoShare has been deleted. Deleting a Workspace is not recommended. If a Workspace was deleted in error, contact MangoShare Support.A recipient tried to sign a document and received the message, “This document requires signatures from multiple signers in a specific order. You will be able to access and sign this document once signing is completed by other signers.” What does this mean?This message is shown when trying to access an electronic signature request, but other signatures are required. When multiple signers are required and the Signers can sign field is set to “In the specified order” for a signature request, all signatures must be performed in order. An email notice will be sent to the recipient when they can sign the document.
See It in Action
Learn More
The following knowledge base articles contain additional information relating to Requesting E-signatures: