
Contacts
December 5, 2024
Inviting your clients and contacts to connect on MangoShare allows them to access the Portal. Not only can they access all of the shared files, file requests, and electronic signature requests you send, but this also lets them review any of their files that you have shared, send and receive messages to keep in contact, and see outstanding tasks.
Additional information about the portal features can be found in the Portal article.
Accessing Contacts
You can access Contacts two ways.
- Click
 Contacts.
…or…
- Click
 Workspaces.
 - Click the link in the Workspace Name column.
- Click Contacts.
Using Contacts
Contacts Page
The Contacts page lists all contacts for all workspaces.
If you have permissions to Allow export of data in your Staff Member settings, the ![]() button can be used to export the current list as a CSV file. This file can be opened in a spreadsheet application, such as Microsoft Excel. Additional information about your settings can be found in the Staff Members article.
button can be used to export the current list as a CSV file. This file can be opened in a spreadsheet application, such as Microsoft Excel. Additional information about your settings can be found in the Staff Members article.
Columns in the List are optional. The ![]() Columns button allows you to optionally select the Checkbox selection, Contact, Email, Phone, and/or Address check boxes, which will display these columns. Select the Show/Hide All check box to select or clear all of the columns in this list.
Columns button allows you to optionally select the Checkbox selection, Contact, Email, Phone, and/or Address check boxes, which will display these columns. Select the Show/Hide All check box to select or clear all of the columns in this list.
The ![]() Filters button allows you to filter by the Contact, Email, Phone, or Address. Select a Column and Operator, then enter a Value. To remove the filter, click the
Filters button allows you to filter by the Contact, Email, Phone, or Address. Select a Column and Operator, then enter a Value. To remove the filter, click the ![]() (Delete) icon.
(Delete) icon.
You can click on the header of many columns to sort the records shown by the values in that column. Click the header again to reverse the sort. The ![]() (Menu) icon in each column header allows you to
(Menu) icon in each column header allows you to ![]() Sort By ASC,
Sort By ASC, ![]() Sort By DESC,
Sort By DESC, ![]() Filter,
Filter, ![]() Hide Column, or
Hide Column, or ![]() Manage Columns. Click on the header of the Checkbox selection column to select all records in the list, even if they are not shown on the current page.
Manage Columns. Click on the header of the Checkbox selection column to select all records in the list, even if they are not shown on the current page.
At the bottom of the window, you can select how many Rows per page are displayed in increments of 25, 50, or 100. The < and > buttons can be used to move between pages.
Click in the Contact column to open the Contact Detail pane.

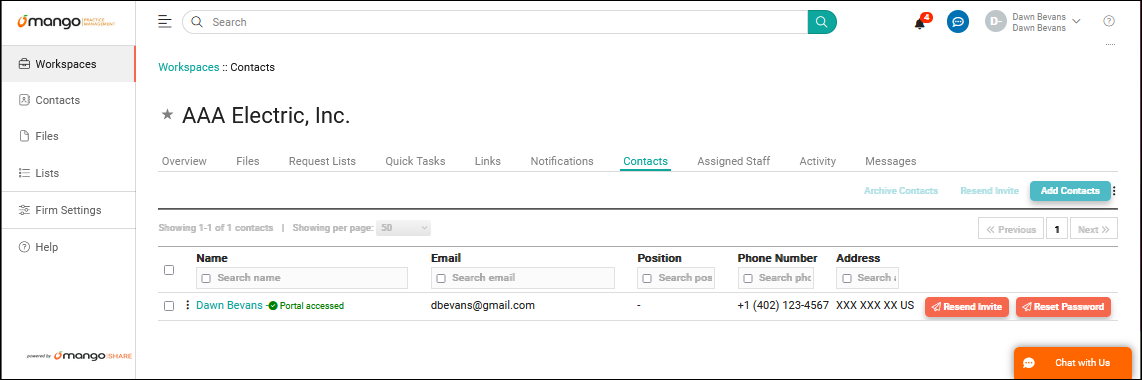
Contacts tab of Workspaces
On the Contacts tab of your client’s workspace, you can select how many Contacts are Showing per page in increments of 25, 50, or 100. The << Previous and Next >> buttons can be used to move between pages.
The ![]() (Menu) column provide access to the View Archive option to show records that have been archived. These records can be deleted or reinstated as needed. For additional information, see the Archiving article.
(Menu) column provide access to the View Archive option to show records that have been archived. These records can be deleted or reinstated as needed. For additional information, see the Archiving article.
The Search field can be used to locate records containing specific text in each column. To clear the search, delete the text from the field or clear the check box.
You can search for records containing specific text within a column by selecting the check box in the column header and entering the text. To clear the search, clear the check box from the column header.
In the Name column, contacts can have one of three statuses: No invite sent if the contact was added but they were not invited to the Client Portal, Invite sent if the contact was invited to the Client Portal but has not accepted it yet, or Portal accessed if the contact has accessed the Client Portal.
Click in the Contact column to open the Contact Detail pane.
Adding New Contacts
You can add new Contacts from the Contacts tab of Workspaces.
- Click Add Contact to display the Invite client users to window.
- Enter the contact’s information.
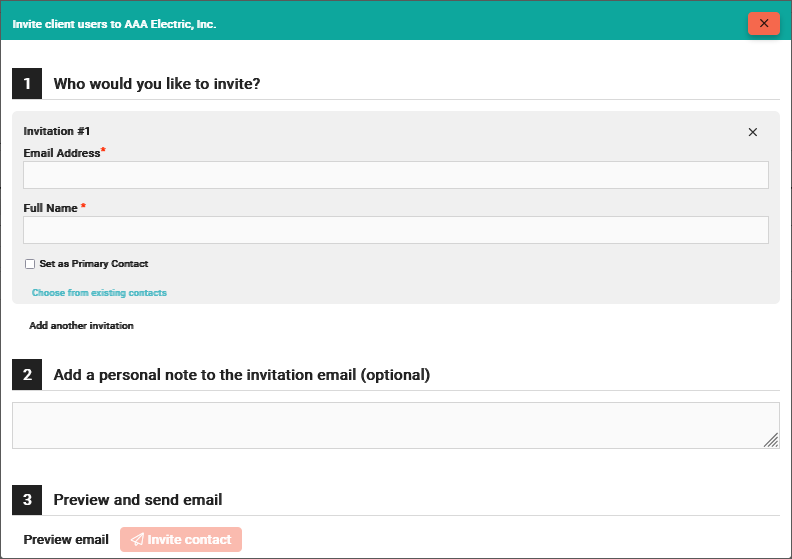
- Click Invite contact.
- Select Upload only (add the contact without inviting them to the Client Portal) or Yes, upload and send invite (add the contact and invite them to the Client Portal).

Editing Contacts
You can edit contacts from ![]() Contacts or from the Contacts tab of
Contacts or from the Contacts tab of ![]() Workspaces.
Workspaces.
- Click in the Contact column to open the Contact Detail pane.
- On the Personal Info tab:
- Mouse over the information you want to edit and click Edit.
- Optionally click +Add phone or +Add address to add an additional phone number and/or address.
- Optionally specify a Shared Secret Question, which can be used by this contact to access shared files, file requests, and signature requests. Additional information about these can be found in the Overview of File Links article.

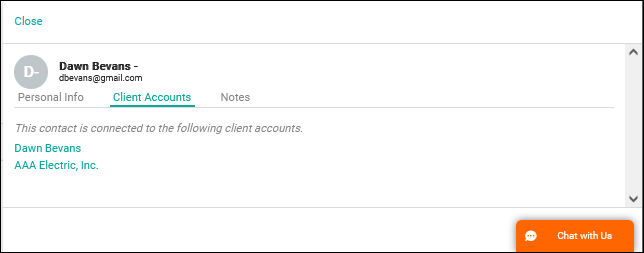
- On the Client Accounts tab:
- Click the contact’s name to open the Files tab for the contact in Workspaces.
- Click the workspace name to open the Files tab for the Workspace.
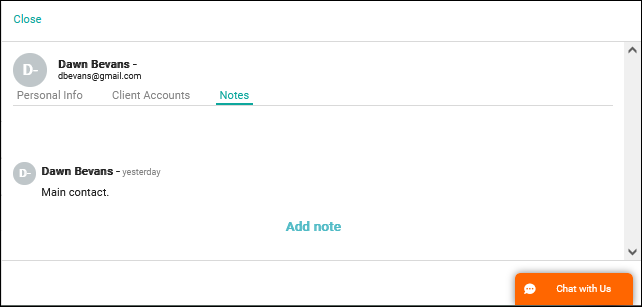
- On the Notes tab:
- Click Add note to add a note to the contact.
- Click Add note to add a note to the contact.
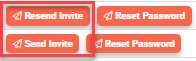
Sending and Resending Client Portal Invites to Contacts
Client Portal invites can be sent, or resent, for any contact.
To send or resend an invite to an individual contact
- On the Contacts tab of the Workspaces window, click the Send Invite or Resend Invite buttons for an individual contact.
To send or resend an invite to multiple contacts
- In the Contacts window or on the Contacts tab of the Workspaces window, select each contact to which you want to send an invite.
- Click Resend Invite.

Resetting a Contact’s Password
To reset a contact’s password, click Reset Password on the Contacts tab of the Workspaces window. An email will be sent to the contact, prompting them to reset their password. The reset link will be active for 60 minutes.
Archiving a Contact
Contacts can be archived or reinstated from the archive. See the Archiving article for more information.
See It in Action
Learn More
The following knowledge base articles contain additional information relating to Contacts: