
Files Overview
November 19, 2024
The Files menu provides access to lists of files and folders stored in MangoShare. Files can be stored for a client’s workspace, for a staff member, or in a general folder for the firm.
Accessing Files
You can access Files from the menu.
- Click
 Files.
Using Files
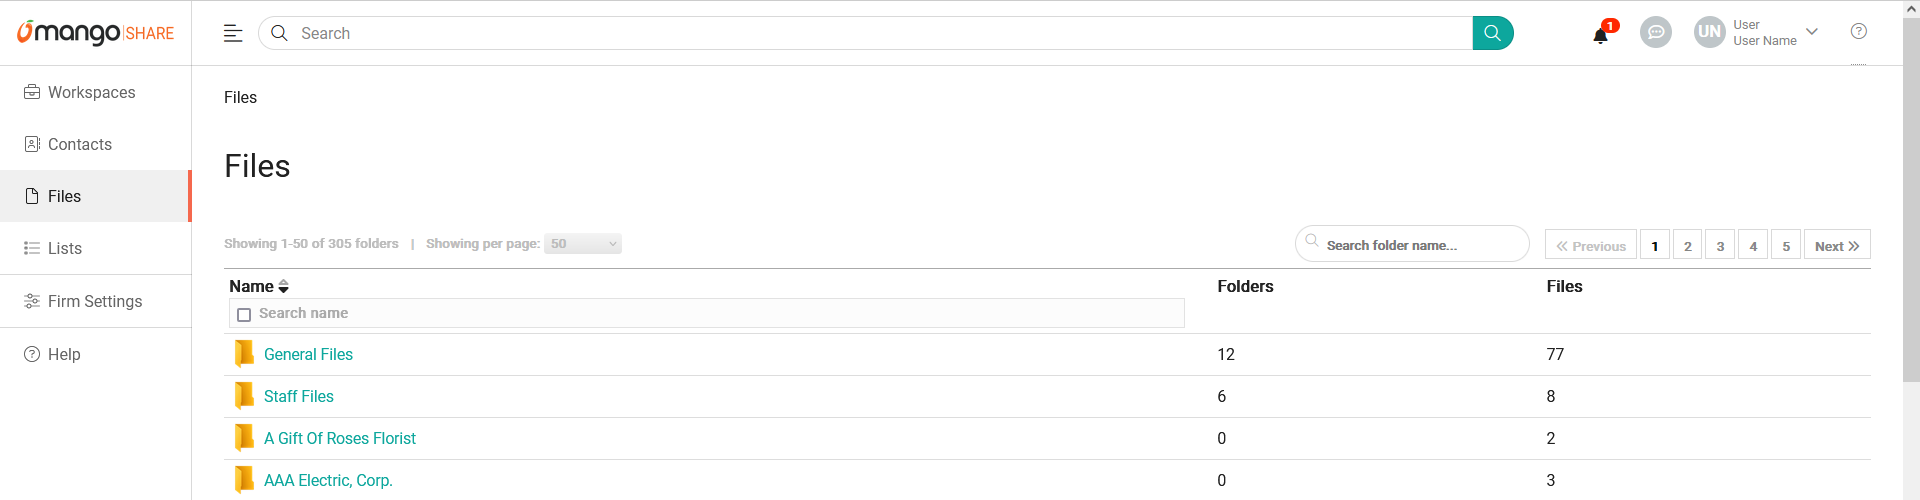
The main Files list shows folders for each of your workspaces, as well as a count of included files and folders. Additionally, folders for General Files and Staff Files are available.
The Search field can be used to locate folders containing specific text in the Name column. To clear the search, delete the text from the field.
You can search for records containing specific text within the Name column by selecting the check box in the column header and entering the text. To clear the search, clear the check box from the column header.
By default, the list shows a limited number of workspaces per page. You can use the << Previous and Next >> buttons or the page number to browse through the records. To see more or fewer results per page, click the Showing per page dropdown. You can choose to display 25, 50, 100, or all records on a single page; note that showing more records on one page can cause delays when loading the list.
You can click on the header of the Name column to sort the records shown by the values in that column. Click the header again to reverse the sort.
Click on any of the workspace folders to see a list of files and folders for that client.
Using the Folder List
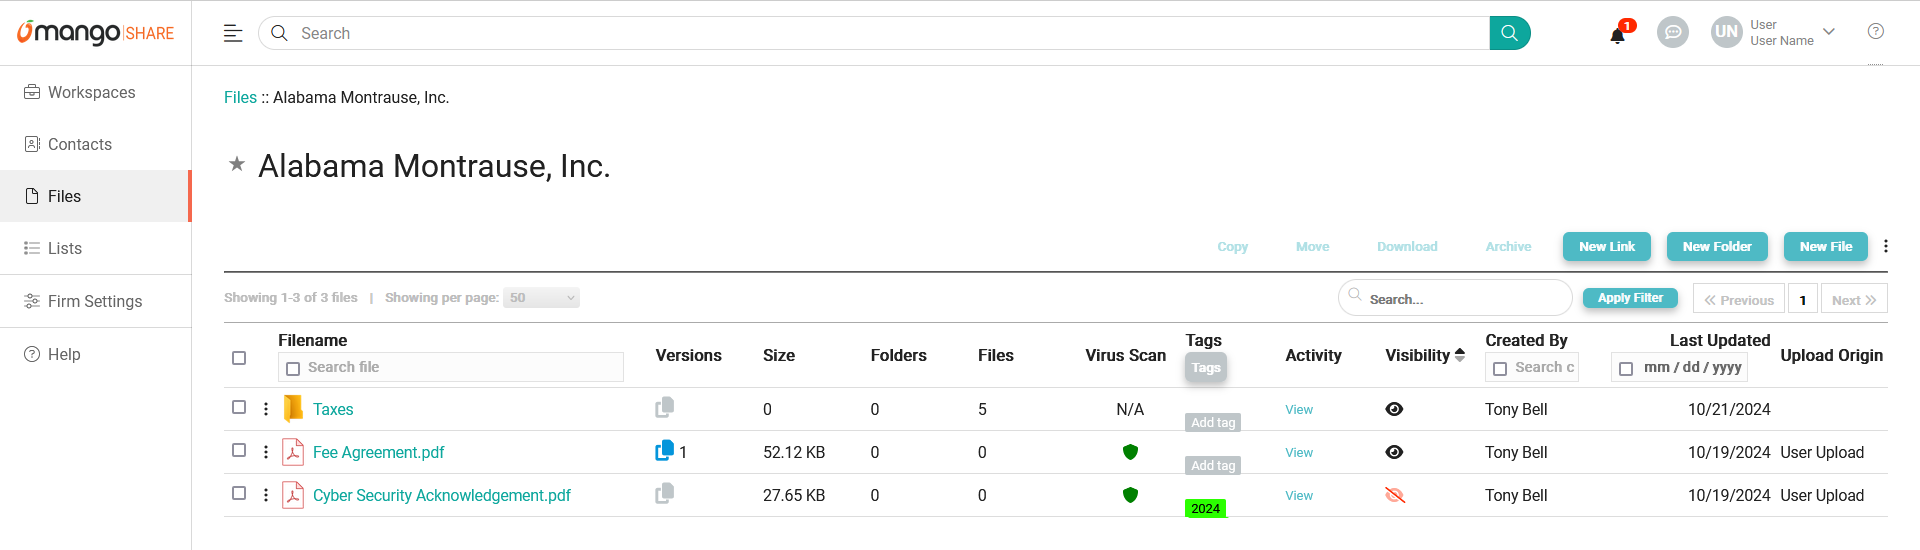
The New Link button can be used to send a link to a client.
- Click the Share files option to send a link that allows recipients to access files that you share.
- Click the Request files option to send a link that allows recipients to upload files for you to access.
- Click the Request signature option to send a link that allows recipients to electronically sign a document that you share, and then return the completed document to you.
Additional information about sharing, requesting, and signing files can be found in the Overview of File Links article.
The New Folder button can be used to create one or more folders for the workspace.
- Click Create new folder to add a folder to the current list. Enter the Folder Name and click Save.
- Click Apply folder template to create folders for the selected workspaces based on a folder template.
Information on creating folder templates can be found in the Folder Templates article.
The New File button can be used to add one or more files to the workspace.
The ![]() (Menu) icon provides access to the View Archive option. Click this option to show records that have been archived. These records can be deleted or reinstated as needed. While viewing archived records, the
(Menu) icon provides access to the View Archive option. Click this option to show records that have been archived. These records can be deleted or reinstated as needed. While viewing archived records, the ![]() (Menu) will include an All Files option to return to the normal list. For additional information, see the Archiving article.
(Menu) will include an All Files option to return to the normal list. For additional information, see the Archiving article.
The Search field can be used to locate files and files containing specific text in the Filename column. Enter a value and click Apply Filter to restrict the list to matching files and folders. To clear the search, delete the text from the field and click Apply Filter.
You can search for records containing specific text within the Filename, Tags, Created By, and Last Updated columns by selecting the check box in the column header and entering the text. To clear the search, clear the check box from the column header.
By default, the list shows a limited number of workspaces per page. You can use the << Previous and Next >> buttons or the page number to browse through the records. To see more or fewer results per page, click the Showing per page dropdown. You can choose to display 25, 50, 100, or all records on a single page; note that showing more records on one page can cause delays when loading the list.
You can click on the header of the Visibility column to sort the records shown by the values in that column. Click the header again to reverse the sort.
In the Filename column, click on any of the folders to see a list of files in that folder. Click on any of the files to view a preview of the file. For additional information, see the File Preview article.
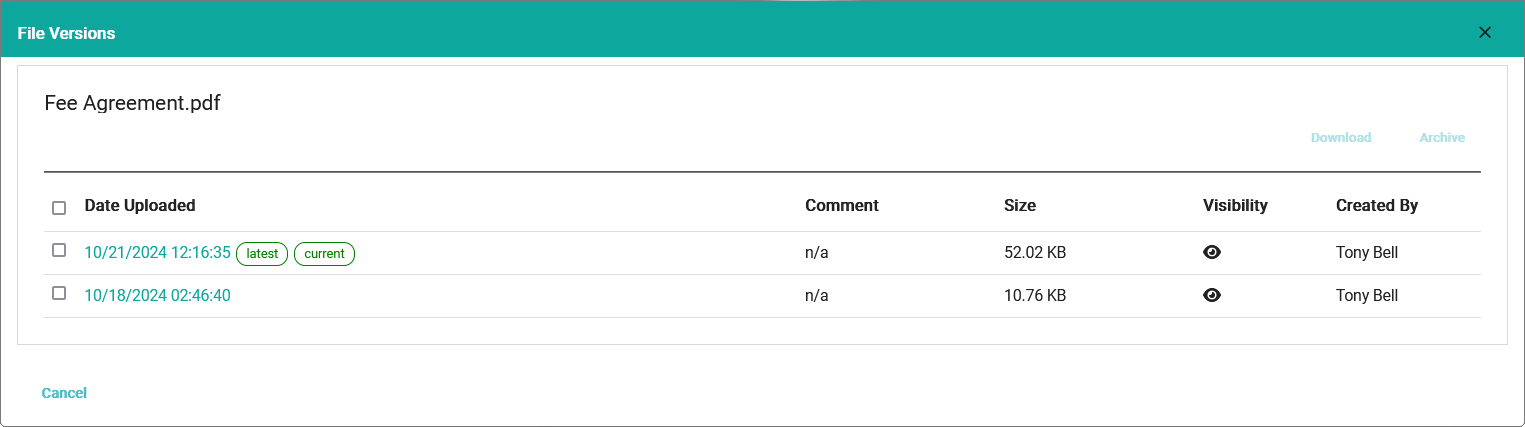
When File Versioning is enabled on the Advanced Settings tab of Firm Settings, a Versions column is shown. The ![]() (Versions) icon is shown when multiple files with the same name are uploaded to the same folder. Click this icon to see a list of file versions. Click the Date Uploaded column to view that version in the File Preview window. Click the eye icon in the Visibility column to toggle whether that version of the file is visible (
(Versions) icon is shown when multiple files with the same name are uploaded to the same folder. Click this icon to see a list of file versions. Click the Date Uploaded column to view that version in the File Preview window. Click the eye icon in the Visibility column to toggle whether that version of the file is visible (![]() ) or hidden (
) or hidden (![]() ) in the portal. Select one or more file versions to Download or Archive the selected file versions. For additional information, see the Advanced Settings, File Preview, Portal, and Archiving articles.
) in the portal. Select one or more file versions to Download or Archive the selected file versions. For additional information, see the Advanced Settings, File Preview, Portal, and Archiving articles.
The Virus Scan column will display an icon for the latest virus scan. If the file has been scanned and is safe, the ![]() (Safe) icon is shown. If a file has been scanned and is infected, the
(Safe) icon is shown. If a file has been scanned and is infected, the ![]() (Infected) icon is shown and hovering over the icon will display the name of the detected virus. Files that have not been scanned will display the
(Infected) icon is shown and hovering over the icon will display the name of the detected virus. Files that have not been scanned will display the ![]() (Not yet scanned) icon, and ones that are currently being scanned will display the
(Not yet scanned) icon, and ones that are currently being scanned will display the ![]() (Scan in progress) icon.
(Scan in progress) icon.
Click the Tags column to display the Tags window, where you can add or remove tags.

Click the View link in the Activity column to see a list of activity on the file or folder, including when they were created, when file links are sent, when links are accessed, when visibility was changed, and more.
Click the eye icon in the Visibility column to toggle whether the file is visible or hidden. An enabled eye (![]() ) indicates the file is visible to contacts in the portal, and a disabled eye (
) indicates the file is visible to contacts in the portal, and a disabled eye (![]() ) indicates the file is hidden from the portal. For additional information, see the Portal article.
) indicates the file is hidden from the portal. For additional information, see the Portal article.
Click the ![]() (Menu) icon to the left of the row to display a list of actions to perform on the specific file or folder.
(Menu) icon to the left of the row to display a list of actions to perform on the specific file or folder.
- Click Archive File or Archive Folder to archive the selected file or folder. For additional information, see the Archiving article.
- Click Download File or Download Folder to download a copy of the selected files and folders. When downloading a folder, the folder and its contents will be downloaded as a ZIP archive. This file can be unzipped by right-clicking on the ZIP archive and selecting Extract All, or using a separate extraction utility.
- Click File Activity to view a list of activity on the file, including when it was created, when file links are sent, when links are accessed, when visibility was changed, and more.
- Click Move File or Move Folder to move the selected file or folder.
- Click Rename File or Rename Folder to display the Filename column as an editable field. Make any changes and then click Save.
- Click Request Signature to send a link that allows recipients to electronically sign the selected document, and then return the completed document to you. For additional information, see the Requesting E-Signatures article.
- Click Share Folder or Share File to send a link that allows recipients to access file(s) that you share. For additional information, see the Sharing Files article.
- Click Virus Scan to scan the selected file for infections. Files can optionally be scanned automatically when they are added if the Automatically scan uploaded files for viruses option is enabled on the Advanced Settings tab of Firm Settings. For additional information, see the Advanced Settings article.
Finally, you can select one or more records in the List to display the Batch Options. These options will perform actions on all selected records.
- Click Copy to make a copy of the selected files and folders.
- Click Move to move the selected files and folders.
- Click Download to download a copy of the selected files and folders. When downloading a folder, the folder and its contents will be downloaded as a ZIP archive. This file can be unzipped by right-clicking on the ZIP archive and selecting Extract All, or using a separate extraction utility.
- Click Archive to archive all selected files and folders. For additional information, see the Archiving article.
- Click New Link, and then click Share files option to send a link that allows recipients to access files that you share. For additional information, see the Sharing Files article.
- Click New Link, and then click Request files option to send a link that allows recipients to upload files for you to access. For additional information, see the Requesting Files article.
- Click New Link, and then click Request signature option to send a link that allows recipients to electronically sign a document that you share, and then return the completed document to you. For additional information, see the Requesting E-Signatures
To apply a folder template
- Click New Folder, and then click Apply folder template.
- Click Select folder template and select the folder template.
- Optionally set the Associate with the template If the Associate with the template toggle is on (
 ), changes to the folder template will automatically be applied to the selected workspaces. If the Associate with the template toggle is off (
 ), folders for the selected workspaces will be created based on the selected folder template, but changes to the folder template will not affect the workspaces.
 - Click Apply Template.
To add new file(s)
- Click New File.
- Select the file(s) in the Drop files here or click to upload field.
- Optionally select the Visibility to client (Visible or Hidden). Hidden files will not appear in the portal for contacts to access.
- Optionally click Select Folder and select which folder to upload to. By default, files will be added to the current folder.
- Click Upload & save.
To copy file(s) and/or folder(s)
- Select one or more files or folders in the list, or open the preview of a file.
- Click Copy.
- Select the workspaces to copy the file to.
- Optionally click Select Folder and choose a folder in that workspace. By default, files will be added to the base folder.
- Click Save.
To move file(s) and/or folder(s)
- Select one or more files or folders in the list, or open the preview of a file.
- Click Move.
- Select the workspaces to copy the file to.
- Optionally click Select Folder and choose a folder in that workspace. By default, files will be added to the base folder.
- Click Save.
To add tags to files and folders
- Click the Tags column for a file or folder.
- Optionally enter text to Search for a tag. If the specified text is not found, the option to Create that tag is shown. Click Create to add the tag to the list and apply it to the file or folder.
- Optionally click on any of the tags in the list to apply it to the file or folder.
- Applied tags are shown at the top of the window; click (Remove) to remove the tag from the file or folder.
- Click outside of the window to dismiss it.
For additional information, see the Custom Tags article.
General Files
The General Files folder is a place to store files that are not related to a specific workspace or staff member. Click on the General Files folder to see a folder list for these files.
Generally, files are only stored here temporarily (such as when a potential client needs to sign forms) and are then moved into another folder list. However, some firms need to maintain files that are not related to any client or staff member, so folders and files can be stored here.
Staff members with permissions to Show General Files can access the General Files folder. For more information, see the Staff Members article.
Staff Files
The Staff Files folder is a place to store files for specific staff members that are not related to a client’s workspace. This folder contains subfolders for each staff member. Click on the staff member’s folder to see a folder list for their files.
Staff members with permissions to Show Staff Folders can access the Staff Files folder. For more information, see the Staff Members article.
Common Questions About Files
- I can’t see folders for some workspaces. Why is this?
- Users without Owner permissions do not have rights to workspaces they are not assigned. The Files window is restricted to the workspaces of clients you are assigned. If you need access to additional workspaces, a user with Owner access can assign you to that workspace, or they can change your permission level.
- Some users can’t see the General Files folder. Why is this?
- Users without the Show General Files permission selected do not have rights to view the General Files folder. If they need access to General Files, a user with Owner access can grant that permission.Note: The General Folders location is only protected by this permission, and therefore it is strongly recommended that you only store files in this folder that all users could potentially have access to. Most files should be stored in a specific workspace instead, which automatically restricts access to assigned users.
- Some users can’t see the Staff Files folder. Why is this?
- Users without the Show Staff Folders permission selected do not have rights to view the Staff Files folders. If they need access to Staff Files folders, a user with Owner access can grant that permission.Note: It is uncommon for users to store files in the Staff Files folders. Typically, these are used to store firm files related to each user. Most files should be stored in a specific workspace instead, which automatically restricts access to assigned users.
See It in Action
Learn More
The following knowledge base articles contain additional information relating to Files: