
Advanced Settings
December 3, 2024
Advanced Settings provides settings for files, links, watermarks, contact user, email personalization, and a contacts banner message.
Accessing Advanced Settings
You can access Advanced Settings via Firm Settings.
- Click
 Firm Settings.
 - Click the Advanced Settings tab.
Using Advanced Settings
The Advanced Settings tab shows the currently configured settings. Settings can be edited by clicking the Edit button at the bottom of the window, making the desired changes, and then clicking Update.
This tab is divided into seven sections: Files, Links, Watermarks, Contact User, Email Personalization, Contacts Banner Message, and Account Security.
Files
The following options are available in the Files section.
Enable PDF Editing (using PDFtron)
If PDF editing is enabled, you can add markups to a PDF document using PDFtron.
To edit a PDF
- Click on a document to open the File Preview window.
- Click the
 (Edit) icon.
 - Use the edit menu to add the desired markups to the PDF.
![]()
Note: Do not use the Fill and Sign editing option. Instead use MangoShare’s Request Signature feature. For additional information, see the Requesting E-Signatures article.
See the File Preview article for more information on using PDFtron to add markup to PDF documents.
Default Status of Newly Uploaded Files
Uploaded files can be hidden or visible to clients in the Portal. Select either Hidden or Visible for the default status of newly uploaded files. Keep in mind that this is the default, but can be changed on a file-by-file basis.
For additional information, see the Portal article.
File Versioning
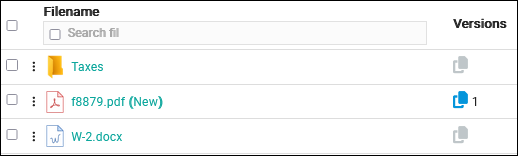
Select to either Disable File Versioning or to Enable File Versioning. When disabled, files of the same name will be listed multiple times:

Whereas if file versioning is enabled, a Versions column will be displayed, and how many additional versions of the document have been uploaded. Click on ![]() to open the File Versions window.
to open the File Versions window.
For more information on File Versions, see the Files Overview article.
Show ‘New’ Label on Newly Uploaded Files
You can optionally show the text “(New)” on newly uploaded files.
Archive Files Automatically after (Days)
You can set the number of days after uploading a file that it will be automatically archived. Leave this at zero or blank to disable automatic archiving. For information on archiving files, see the Archiving article.
Download Multiple Files as
The Download Multiple Files as option provides the ability to specify your clients download Individual Files or Zip Files. When selecting Individual Files, each file will be downloaded separately. When selecting Zip Files, one zip file that includes all of the selected files will be downloaded.
Show General Files for All users
Toggle General File for All users on to have all users see files that have been uploaded in the General folder. Toggle this option off to only allow users to see files that they have uploaded in the General folder.
Show staff folders for All users
Toggle Show staff for All users on to have users see all Staff folders and files. Toggle this option off to only allow users to see their own Staff folder and files.
Automatically scan uploaded files for viruses
Toggle Automatically scan uploaded files for viruses on to use Mango’s built-in virus scanner when new files are added. Toggle this option off to skip the automatic scan. Files can be scanned at any time from the files list.
For additional information, see the Files Overview article.
Links
The following options are available in the Links section. These settings apply to shared file, file request, and signature request links. For additional information, see the Overview of File Links article.
Show Terms and Conditions
When Show Terms and Conditions is toggled on, clients will have to agree to your terms and conditions whenever they receive a linked document.
Terms & Conditions Option on Sharefiles Link Creation
Enter the terms and conditions you want your clients to see.
Show Email Address Input for Guest Users on Request Link
When this option is enabled, a prompt for an email address is displayed when a link is opened by a contact that is not associated with the Workspace. When this option is disabled, the guest user will still be prompted for their first and last name.
Show Company Name Input for Guest Users on Request Link
When this option is enabled, a prompt for a company name is displayed when a link is opened by a contact that is not associated with the Workspace. When this option is disabled, the guest user will still be prompted for their first and last name.
Allow the User to Add a Recipient in the File Request Link
When this option is enabled and a client receives a request link, there will be an option to Add Recipient. If they click Add Recipient, they will have the option to select a staff member. When the document is uploaded via that Request Link, the selected staff member will receive a notification.
Make recipient required in Request Link
When this option is enabled, clients will be required to add a recipient when uploading documents to a request link.
Expire Share File Links Automatically after (Days)
You can set the number of days after a shared file link is created that it will automatically expire. Leave this at zero or blank to disable automatic expiration.
Expire Request File Links Automatically after (Days)
You can set the number of days after a file request link is created that it will automatically expire. Leave this at zero or blank to disable automatic expiration.
Expire Signature Request Links Automatically after (Days)
You can set the number of days after a signature request link is created that it will automatically expire. Leave this at zero or blank to disable automatic expiration.
Default Authentication Scheme for Links
This option determines how the client receives a link. Select Direct if you want the client to have immediate access once they click on a link. Select Question And Answer if you want the client to be presented with a question that they need to answer correctly before receiving access. The list of questions for the Question/Answer option can be configured at the bottom of this section. When sending a file link, you can also choose to use Secret Question associated with the client or any contact. The Secret Question for a client can be configured on the Overview tab of the Workspace Detail, and the Secret Question for a contact can be configured on the Personal Info tab of the Contact pane. For additional information, see the Workspace Details and Contacts articles.
Allow Users to change default authentication scheme
Enable this option if you want users to be able to switch from Direct Link to Question/Answer, or vice versa.
Note: When the Default Authentication Scheme for Links is set to Question And Answer and the Allow Users to change default authentication scheme is disabled, any Secret Questions for the selected client or contact are also available.
Allow Users to use Non-contact signers
Enable this option if you want signers who are not contacts in the Workspace to be able to sign a document. We recommend leaving this option enabled.
Secret Question
You can optionally enter your own secret question and click Add Secret Question. The question will be added to the List of Questions.
List of Questions
The List of Questions is a list of secret questions. Mango provides six questions you can optionally use, or you can write your own. Click and drag the ![]() icon to reorder the questions, or click Delete to delete a question.
icon to reorder the questions, or click Delete to delete a question.
Watermarks
The following options are available in the Watermarks section.
Allow users to apply watermarks on files shared through Share Links
Enable this option to allow staff to add watermarks to files.
Define available watermarks to apply them on files shared through Share Links
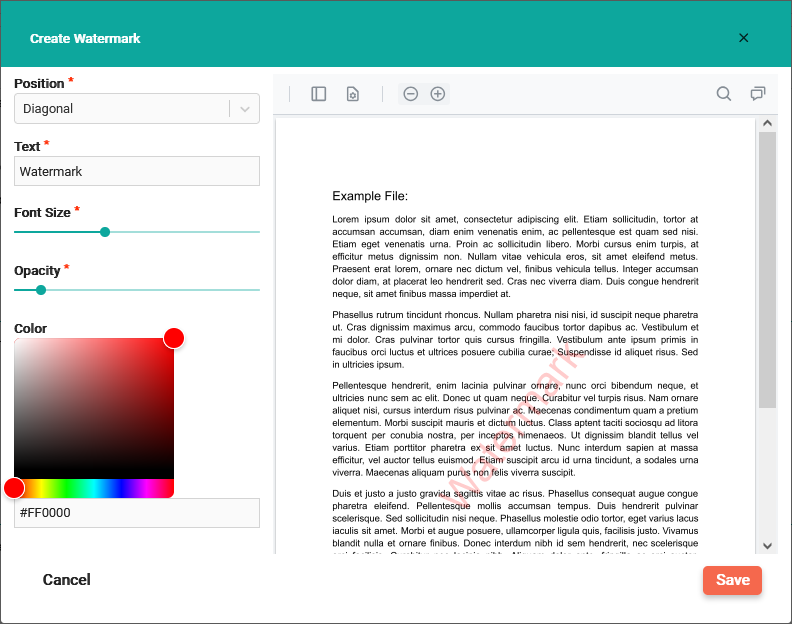
Click Add Watermark to open the Create Watermark window.
In the Create Watermark window, you can select the Position, Text, Font Size, Opacity, and Color of the Watermark. Click Save to save the watermark.
List of Watermarks
Once a watermark has been created, it will be listed in the List of Watermarks. You can Preview, Edit, or Delete the watermark from this list.
Contact User
The following options are available in the Contact User section. These settings apply to what a contact can do in the Portal or when interacting with a file link. For additional information, see the Portal and Overview of File Links articles.
Allow Contacts to Create New Folders
Enable this option to allow folder creation in the Portal or when uploading requested files. Disable this option to prevent contacts from creating folders. Staff members can still create folders for workspaces they have access to.
Allow Contacts to Delete Files
Enable this option to allow files to be deleted in the Portal. Disable this option to prevent contacts from deleting files.
Note: Files that are deleted from the Portal are actually archived, and can be restored by staff members. For additional information, see the Archiving article.
Allow Contacts to Rename Files
Enable this option to allow files to be renamed in the Portal. Disable this option to prevent contacts from renaming files. Staff members can still rename files for workspaces they have access to.
Allow Contacts to Move Files
Enable this option to allow files to be moved between folders in the Portal. Disable this option to prevent contacts from moving files. Staff members can still move files for workspaces they have access to.
Email Personalization
The following options are available in the Email Personalization section.
Use Logged-In User Name & Email Address
Enable this option to use your user name and email address when sending an email from MangoShare instead of a generic user name and email address. Disable this option to specify the From Name and Reply-To Email Address that will be used when sending email from MangoShare.
Use Firm Wide Inactivity Logout Time
Enable this option to automatically log out staff after a specified Inactivity Logout Time.
Inactivity Logout Time (Minutes)
Enter the number of minutes after which an inactive staff member is logged out.
Contacts Banner Message
The following options are available in the Contacts Banner Message section. The banner message is shown at the top of the Portal by default. For additional information, see the Portal article.
Show a banner message to all Contacts of the Firm Clients
Enable this option to show a banner message.
Banner Message Text
Enter the desired text for the banner message.
Account Security
The following option is available in the Account Security section.
Force members to enable Two Factor Authentication
Enable this option to require all staff members to use two factor authentication. Authentication can be configured in the My Profile window for each user. For additional information, see the My Profile article.
Enable managed single sign-on
Enable this option to automatically link users to a Single Sign On (SSO) provider identity based on their email address. Disable this option to allow users to manager their own SSO provider options. Connecting to a SSO provider can be done in the My Profile window for each user. For additional information, see the My Profile article.
Editing Advanced Settings
You can edit Advanced Settings as needed.
- At the bottom of the window, click Edit.
- Make the desired changes.
- At the bottom of the window, click Update.
See It in Action
Learn More
The following knowledge base articles contain additional information relating to Advanced Settings: