Using the Print Driver
December 5, 2024
When working with multiple business applications, it can be difficult to stop, access the file, and upload it before being able to share it with your clients. MangoShare makes this easy by providing the ability to “Print” any document directly to your Workspaces and share it to your clients.
Installing the Print Driver
You can install the MangoShare Print Driver using the following steps. (Note: The link below is also available in the Welcome to MangoShare email.)
- Visit https://mangotango.imaginetime.com/share/866e9fc85d564e63316adc0b.
- Select I agree to these Terms & Conditions and click Agree.
- Specify your Name, Email address, and Company name, then click Done.
- Hover over the “Print Driver Installer” and click Download.
- Once the download is complete, run the downloaded installer.
- Depending on your security settings, you may get a message that the installer is an executable file. Click OK.
- Depending on your browser settings, you may get a message that the installer wants to download multiple files. Click Allow.
- Depending on your Windows settings, you may get a Windows protected your PC message. Click More info, and then click Run anyway.
- On the ImagineTime Print Driver Setup window, click Next.
- Select I accept the terms in the License Agreement and click Next.
- Select an install location (the default is generally fine) and click Next.
- Click Install.
- Depending on your Windows settings, you may get an elevation message. Click Yes.
- Open any document and select Print. (Tip: Most applications use Ctrl+P to access the Print window.)
- In the list of printers, select ImagineTime Print Driver and then click Print.
- Click Sign in, and then enter the Email Address and Password associated with your MangoShare account.
Note: The ImagineTime terminology is prior branding and will be updated to MangoShare in the future.
Using the Print Driver
Once you are signed in, the ImagineTime window will display options to securely send, receive, and obtain electronic signatures on documents.

To upload a file
- Print the document using the MangoShare Print Driver.
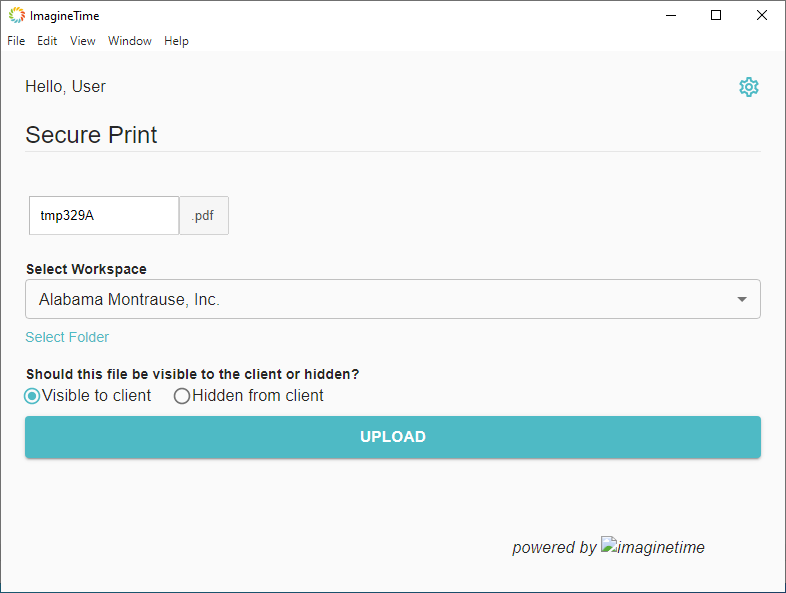
- Specify a Filename. The file will automatically be generated as a PDF, and the extension is already specified.
- Specify a workspace to store the document. This will default to “Upload to general files,” but can be changed as needed.
- Optionally click Select folder and select which folder to upload to. By default, files will be added to the base folder.
- Optionally change the visibility of the file (Visible to client or Hidden from client).
- Click UPLOAD.
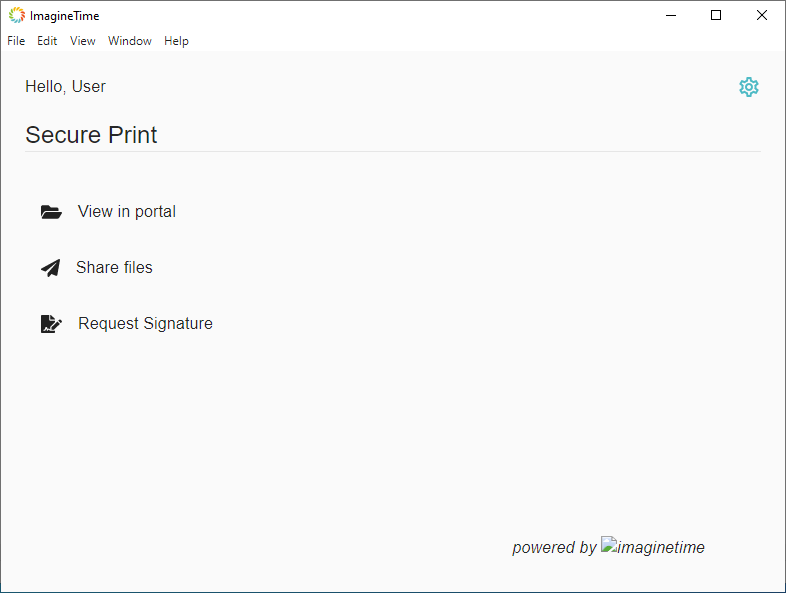
- Click View in portal, Share files, or Request Signature to determine the next steps.

View in Portal
The View in portal option in the ImagineTime window will open MangoShare to the File Preview window for the new document. For additional information, see the File Preview topic.
Share Files
The Share files option in the ImagineTime window is used to send one or more files to a client or other party. The recipient is provided a secure link to download the files, which are stored on the ImagineShare servers.
To send files
- Print the document using the MangoShare Print Driver.
- Click Share files.
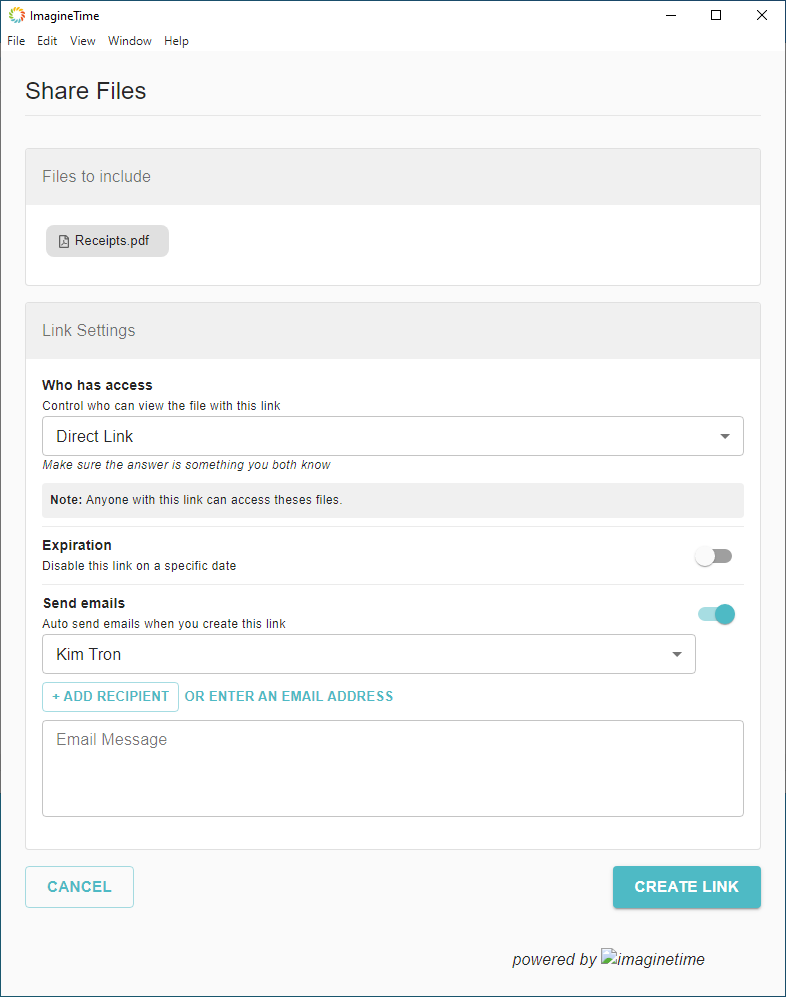
- Specify Who has access to the file (Direct Link or Question/Answer). The default value for this field depends on the Default Authentication Scheme for Links option on the Advanced Settings tab of Firm Settings. This field may be disabled if the Allow Users to change default authentication scheme option is disabled on the Advanced Settings tab of Firm Settings.
- If Question/Answer is selected, select a Question and enter a Shared answer. The list of questions for the Question/Answer option can be configured on the Advanced Settings tab of Firm Settings.
- Optionally select to Show Terms and Conditions when accessing the file. The Terms and Conditions can be configured on the Advanced Settings tab of Firm Settings. For additional information, see the Advanced Settings article.
- Optionally specify an Expiration. Depending on the Expire Share File Links Automatically after (Days) option on the Advanced Settings tab of Firm Settings, the link may have a default expiration. For additional information, see the Advanced Settings article.
- To send the email, select Send Emails and specify the recipient(s) and message. If you prefer to send the email yourself, a link will be generated regardless of this setting.
- Click CREATE LINK. The link will be generated and, if selected, an email will be sent automatically.
Additional information about sending files can be found in the Sharing Files article.

Request Signatures
The Request signatures option in the ImagineTime window is used to request a client or other party electronically sign a document. The recipient is provided a secure link to a PDF document, creates an electronic signature and digitally signs the document, and then returns the document to the MangoShare servers.
Before you can use the Request signatures option, you must link your MangoShare account with an account for AssureSign. MangoShare uses AssureSign to automate the electronic signature process. Information on configuring AssureSign can be found in the AssureSign Setup and Template Creation article.
To request a signature
- Print the document using the MangoShare Print Driver.
- Click Request signature.
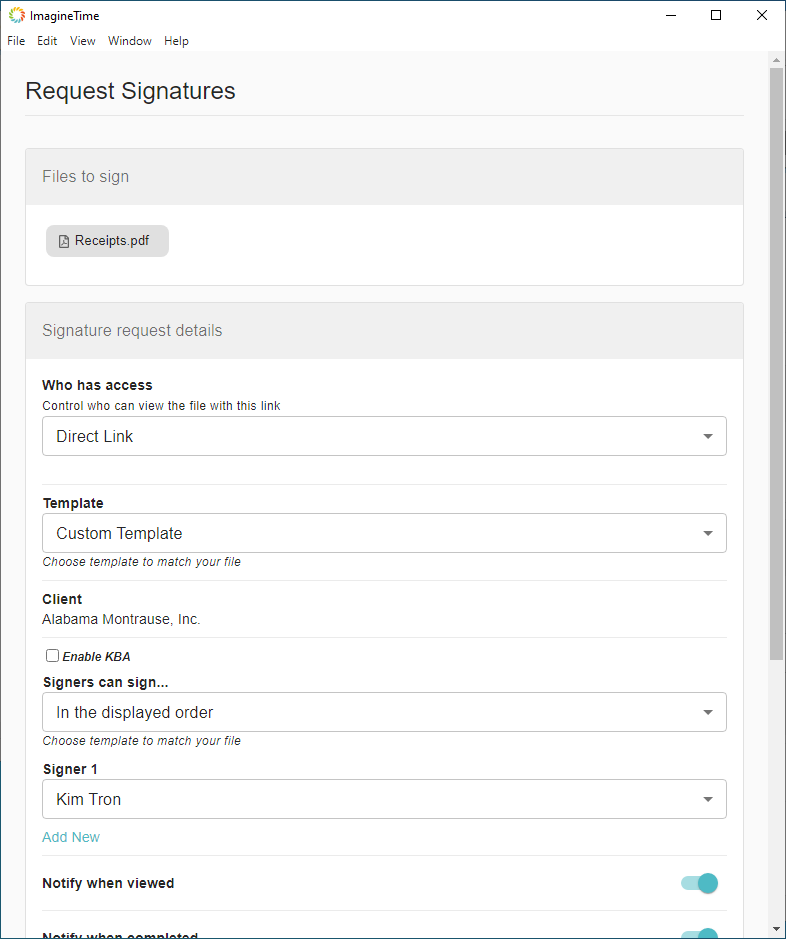
- Specify Who has access to the file (Direct Link, Question/Answer, or Individual Authentication associated with the client or contact). The default value for this field depends on the Default Authentication Scheme for Links option on the Advanced Settings tab of Firm Settings. This field may be disabled if the Allow Users to change default authentication scheme option is disabled on the Advanced Settings tab of Firm Settings.
- If Question/Answer is selected, select a Question and enter a Shared answer. The list of questions for the Question/Answer option can be configured on the Advanced Settings tab of Firm Settings.
- If Individual Authentication is selected, each recipient can be assigned a separate Question and Shared answer.
- In the Template field, select Custom Template or, if defined, one of the reusable templates. Reusable templates are configured in AssureSign for specific forms. For more information, see the AssureSign Setup and Template Creation article. If selecting a Custom Template, the Template Creation window will be shown.
- Select each signer, as defined in the template. If the signer information does not exist as a contact, click Add new and enter their name and email address.
- Optionally select Notify when viewed to receive a notification when the link to the requested document has been opened by the recipient.
- Optionally select Notify when completed to receive a notification when all recipients have signed the requested document.
- Optionally select Weekly Reminder and specify a number of days. When the specified time elapses, if all recipients have not yet signed the requested document, an email will be sent to follow up.
- Optionally select to Show Terms and Conditions when accessing the file. The Terms and Conditions can be configured on the Advanced Settings tab of Firm Settings. For additional information, see the Advanced Settings article.
- Enter any additional message in the Instruction field.
- Click CREATE LINK. The link will be generated and email(s) will be sent automatically.
Additional information about requesting signatures and configuring templates can be found in the Requesting E-signatures article.

Common Questions About the Print Driver
- The ImagineTime window is not displayed when printing a document.
- Verify that the ImagineTime Print Driver is selected in the Print window, and give it a few seconds to load after clicking Print. If the window still doesn’t display, try using the Repair option in the installer.
- Click the Windows Start button (
 ) and open Add or remove programs.
 - Select the ImagineTime Print Driver and click Modify.
- Click Repair.
- Click the Windows Start button (
- The ImagineTime window displays, but some options (File name, Workspaces, Folders, or the Upload button) are unavailable.
- This can indicate that the print driver did not get the correct rights assigned to it during installation, possibly due to security settings on your workstation. Contact your network administrator and resolve any errors or warnings shown in the Windows Event Viewer. Typically, these are displayed in the Application or System logs as a DistributedCOM message.
- The ImagineTime window displays, but the Upload button is dimmed and unavailable.
- When printing, a temporary file name is assigned. Try changing the filename and then click Upload.
See It in Action
Learn More
The following knowledge base articles contain additional information relating to the Print Driver: