Manual Invoice
June 25, 2024
all plans
Manual invoices are used primarily for creating one invoice at a time, allowing you complete control over the invoicing process.
With a manual invoice you can apply discounts, process payments, view client history, and, if using the Narrative Style invoice format, have complete control of the invoice line items that you want to present to your clients.
Accessing Manual Invoice
You can access Manual Invoice from the menu.
- Click
 Billing & Invoicing.
 - Click
 Manual Invoice.
Using the Manual Invoice Window
At the top of the window, there are buttons to view the Tutorial for this window, ✓ Save the invoice, ![]() Clear the Client Name field, open
Clear the Client Name field, open ![]() Invoice Review to finalize your invoice,
Invoice Review to finalize your invoice, ![]() Preview the invoice, view the
Preview the invoice, view the ![]() Invoice History for the selected Client Name, and to
Invoice History for the selected Client Name, and to ![]() Process a Payment.
Process a Payment.
Note: When clicking ✓ Save, the Finalize Action and Invoice Template selections will be saved to the Client as the default for the next time invoices are run. The default can be changed at any time on the Settings tab of the Client View. For additional information, see the Clients View article.

The Manual Invoice window is divided into panels containing options for the invoice.
Client and Invoice Options
Select a Client Name, which enables the other sections on the page. The email and billing addresses are shown below, for reference.
Specify the Invoice Date and an Invoice Number for the manual invoice.
You can optionally apply a discount. In the Apply Discount field, select Flat Discount to reduce the invoice by a flat dollar amount, or select % Discount to calculate the amount based on a percentage of the total. Click Calc to allocate this discount to the Invoice Items shown. Click Clear to remove the discount from the invoice.
Terms are created in General Settings > Lists > Client Terms. After Terms have been created, you can optionally establish a default at the Company level that will be added to any new client/customer record. If terms are changed during Manual Invoicing, they are automatically saved on the client/customer record when saving the invoice. For additional information on creating terms, see the List Settings article.
There are three types of Finalize Actions to be taken in Invoice Review to complete the invoice: Print, Email, and Finalize Only. When saved, invoices will be displayed in Invoice Review. The Finalize Action will determine how, or if, the invoice is delivered to your client. It will either be previewed for printing, automatically emailed to the client/customer, or simply finalized without printing or emailing.
A default Invoice Template can be established via Settings > Invoices and can be assigned to new customers when adding. The Invoice Template can be changed at the client/customer level and at the manual invoice level. If changed during manual invoicing, then it will be saved to the client/customer record when the invoice is saved. Examples of each Invoice Template format can be found in the Sample Invoices topic.
Totals
Totals are provided for an at a glance breakdown of what the client owes and if there are payments and/or credits associated with the invoice.

Open Time & Expense Records
The Open Time & Expense Records section shows what is to be billed on this invoice. You can filter time and expense records by changing the Bill Through Date, For Staff, and Engagements fields.
You can optionally clear the check box of any line item to exclude it from this invoice. Once excluded, you can select the check box to add it back to the invoice. Removing or readding an item from this section also removes or readds it to the Invoice Items section.
Click  (Expand Open Time Records) to open the Open Time Records or Expense Records window, where you can edit the time or expense record, write up/down the amount, or click Batch Options where you can Delete Selected Items, Update Billed Amount, Update Billing Rate, or Reassign Selected Items to other clients or engagements. If no Time or Expense entry exists, the pencil icon will not be available.
The Exp. column check box can be selected if you do not want expenses to show as a separate line item on the invoice, but to roll them into the billed time amount.
The WUWD column shows the amount of the write up/write down, and includes changes made via the Discount added in the top section, or the Discount added in the Invoice Items section.
The Amount column shows the total for Time and includes any write up/write down amount.
If the Billing Method is Hourly then the Amount will automatically be the amount of the line item.
If the Billing Method is Fixed Fee, then the Fixed Fee that was established at the Client Engagement level will be used for the Amount and the Write Up/Write Down will be automatically calculated.
You can click on the header of many columns to sort the records shown by the values in that column. Click the header again to reverse the sort.

Invoice Items
The Invoice section allows you to add or remove items from the invoice, rearrange the order in which items are displayed on the invoice, or add a Discount.
Click the  (Add) icon to add an Invoice Item to the invoice.
Click the  (Remove) icon to remove the item from the invoice. Clicking this will also remove the item from the Open Time & Expense Records section. If you want to re-add it, you must click Clear, and then select your client again. Alternatively, you can add an Invoice Item with the same Client Engagement, Description, and Amount to re-link them.
Click and drag the  (Reorder) icon to rearrange the order in which items are displayed on the invoice.
The Client Engagements and Invoice Description can optionally be edited in this section. Shortcut Codes can be used for the Invoice Description. A Discount can be applied here, or the Invoice Amount changes.
You can click on the header of the Client Engagements column to sort the records shown by the values in that column. Click the header again to reverse the sort. Keep in mind this will not change the order in which items are displayed on the invoice.

Statement and Internal Invoice Memo
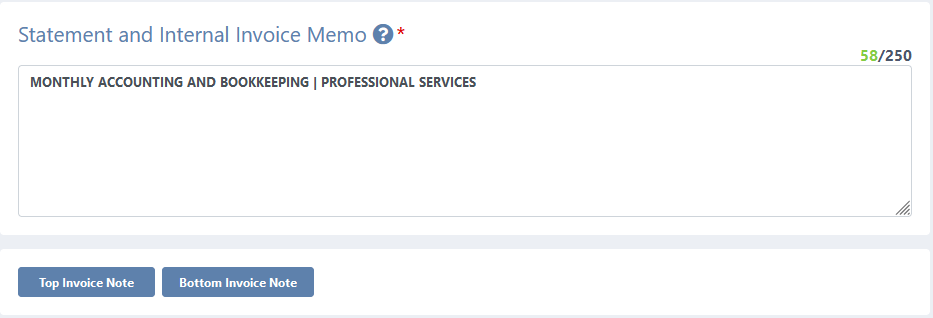
The Statement and Internal Invoice Memo field defaults to the Client Engagements and can be edited as desired. This field can include Wildcards for the month and year. For additional information, see the Wildcards topic.
Click Top Invoice Note or Bottom Invoice Note to add additional notes to the invoice. The Bottom Invoice note can have a default message that is created in Settings > Invoices. The Top and Bottom Invoice Notes can include HTML formatting by clicking the  (Code View) button. For additional information on this feature, see the Using the HTML Editor topic.

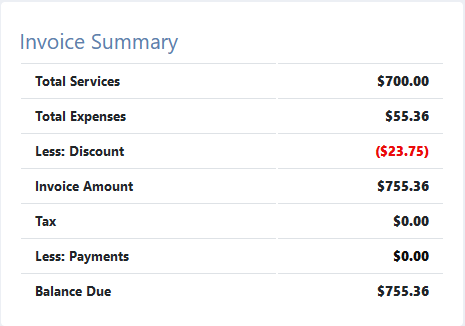
Invoice Summary
The Invoice Summary provides the totals on the invoice.

Open Advance Payments
The Open Advance Payments section displays any advance payments that have been entered for the client, but have not been applied to an invoice. Select the check box in the Apply column to apply the payment to the invoice.
You can click on the header of many columns to sort the records shown by the values in that column. Click the header again to reverse the sort.
If no advance payments exist for the selected client, this section will not be displayed.

Adding a Manual Invoice
To add a manual invoice
- Open Manual Invoice.
- Select a Client Name.
- Optionally Apply Discount.
- Select the Terms, Finalize Action, and Invoice Template.
- Determine which time and expenses you want to include on the invoice.
- Optionally write up or write down time.
- Specify a Memo, and optionally add a Top or Bottom Invoice Note.
- ✓ Save the invoice.
Once the invoice is saved, open Invoice Review to finalize your invoice. For additional information, see the Invoice Review topic.
See It in Action