Clients View
July 29, 2024
all plans
Clients is where you can add or edit clients, and track various information regarding your clients.
Accessing the Client View
You can access the Clients List from the main toolbar or the menu.
- Click the
 (Client List) icon on the toolbar.
…or…
Click Clients on the menu.
 - Select the Client.
Dropdown View vs. Table View
When you open Clients, before a client is selected, you have the option of clicking Table View or Dropdown View, depending on which view you are already in.
For more information on Dropdown View vs. Table View, see the Client List article.
Using the Client View
The Client View is divided into tabs related to specific features:
- Main
- Settings
- Engagement
- Invoices
- Payments
- Time & Expense
- Contacts
- Notes
- Email Logs
- Projects
- Schedule
- Budgets
- To-Do
Main Tab
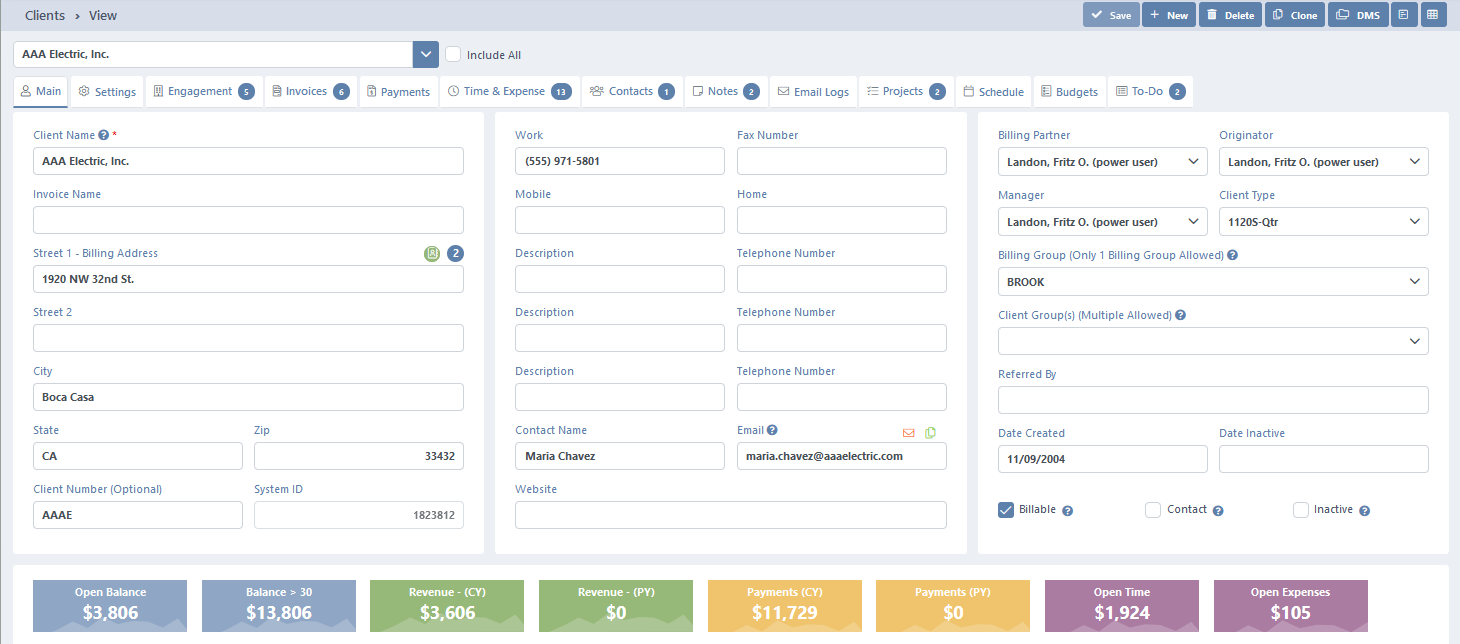
At the top of the ![]() Main tab, buttons are available to ✓ Save any changes, create a + New client,
Main tab, buttons are available to ✓ Save any changes, create a + New client, ![]() Delete the current client,
Delete the current client, ![]() Clone a client, display the
Clone a client, display the ![]() (Scratch Pad) which allows you to add notes about the client, and specify
(Scratch Pad) which allows you to add notes about the client, and specify ![]() (Custom Fields) to add additional information for the client not found on other tabs. Additional information about using custom fields can be found in the User Defined Fields article.
(Custom Fields) to add additional information for the client not found on other tabs. Additional information about using custom fields can be found in the User Defined Fields article.
When MangoShare Integration is enabled in General Settings, a ![]() DMS (Document Management System) button to open MangoShare is also available. For additional information about using MangoShare with Mango, see the Document Management article.
DMS (Document Management System) button to open MangoShare is also available. For additional information about using MangoShare with Mango, see the Document Management article.
The following fields are available:
- Client Name – Specify the client’s name. This will be used on Lists, Reports, and Invoices throughout Mango.
- Invoice Name – Optionally specify how the client’s name will appear on invoices, if different from the Client Name.
Note: The Invoice Name can be used on invoices instead of the Client Name if the Show Alternate Client Name Used for Invoice Printing in Client View check box is selected on the Invoice tab of General Settings. For additional information, see the Invoice Settings article. - Street 1 – Optionally specify the street address of the client. Click the
 (View & Add Client Addresses) icon to view a list of addresses. The following options are available in the Client Billing Address window:
- Select the check box in the Billing column to indicate the address as the default billing address for the client.
- In the Actions column, click the
 (Delete Row) icon to delete the current address, click
  (Save Row) to save changes to the current address, or click + (Add Row) to add a new address.
 - You can click in the Description, Street 1, Street 2, City, State, or Zip columns to edit the contents inline. Simply update the contents of the field and then press Enter.
- Street 2 – Optionally specify additional street address information of the client.
- City – Optionally specify the city of the client’s address.
- State – Optionally specify the state of the client’s address.
- Zip – Optionally specify the zip code of the client’s address.
- Client Number (Optional) – Optionally specify your tracking number for this client.
- System ID – A unique identification number is shown in this field.
- Work – Optionally specify the client’s work telephone number.
- Fax Number – Optionally specify the client’s number for fax communication.
- Mobile – Optionally specify the client’s mobile telephone number.
- Home – Optionally specify the client’s home telephone number.
- Description and Telephone Number – Optionally specify up to three additional phone numbers.
- Contact Name – Optionally specify the name of the contact for this client, if different than specified in the Client Name field.
- Email – Optionally specify the email address of the client. This email address is used by default for receiving emailed invoices and statements, as well as logging into the Client Portal. Click
 (Email Client) to start an email to this address in your default email application. Click
  (Copy URL to Clipboard) to copy the address to the clipboard, where it can be pasted into another application.
 - Website – Optionally specify the website URL for the client.
- Billing Partner – Optionally select the staff member in charge of invoicing this client. Only active staff members can be assigned, but inactive staff may be preserved on existing clients.
- Originator – Optionally select the staff member who brought the client to the company. Any staff member, active or inactive, can be selected as the originator.
- Manager – Optionally select the staff member assigned to manage this client. Only active staff members can be assigned, but inactive staff may be preserved on existing clients.
- Client Type – Select the Client Type. Client types are used to classify clients and are used for filtering and reporting. Client types can be specified by selecting Client Types on the Lists tab of General Settings. For additional information, see the List Settings article.
- Billing Group – Optionally select a Group used for time reports and invoicing. Billing groups can be specified by selecting Groups on the Lists tab of General Settings. For additional information, see the List Settings article.
- Client Group(s) – Optionally select one or more Groups for this client. Client groups are used to classify clients, and can be used for filtering and reporting. Client groups can be specified by selecting Groups on the Lists tab of General Settings. For additional information, see the List Settings article.
- Referred By – Optionally specify how the client was referred to your company.
- Date Created – Specify the date when the client’s case began. If this field has not been specified, today’s date will be entered when the client is saved.
- Date Inactive – Optionally specify the date when the client was made inactive. If the Inactive check box is set and this field has not been specified, today’s date will be entered when the client is saved. Clearing the Inactive check box will clear the value in this field.
- Billable – Select this check box to default new time entry for the client as Billable, or clear this check box to default new time entry as Non-Billable.
- Contact – Select this check box to use this client as a contact. Contacts can have additional information configured. Clear this option if you do not want to use the client as a contact. Additional contacts can be added on the Contacts For additional information, see the Client Contacts article.
- Inactive – Select this check box to mark the client as inactive. Inactive clients are not shown on the list by default. Clear this check box to mark the client as active.
At the bottom of the tab, you can see balances, revenue, payments, and open time/expenses at a glance. Balance > 30 is the amount due older than 30 days, CY is Current Year, and PY is Prior Year.

Settings Tab
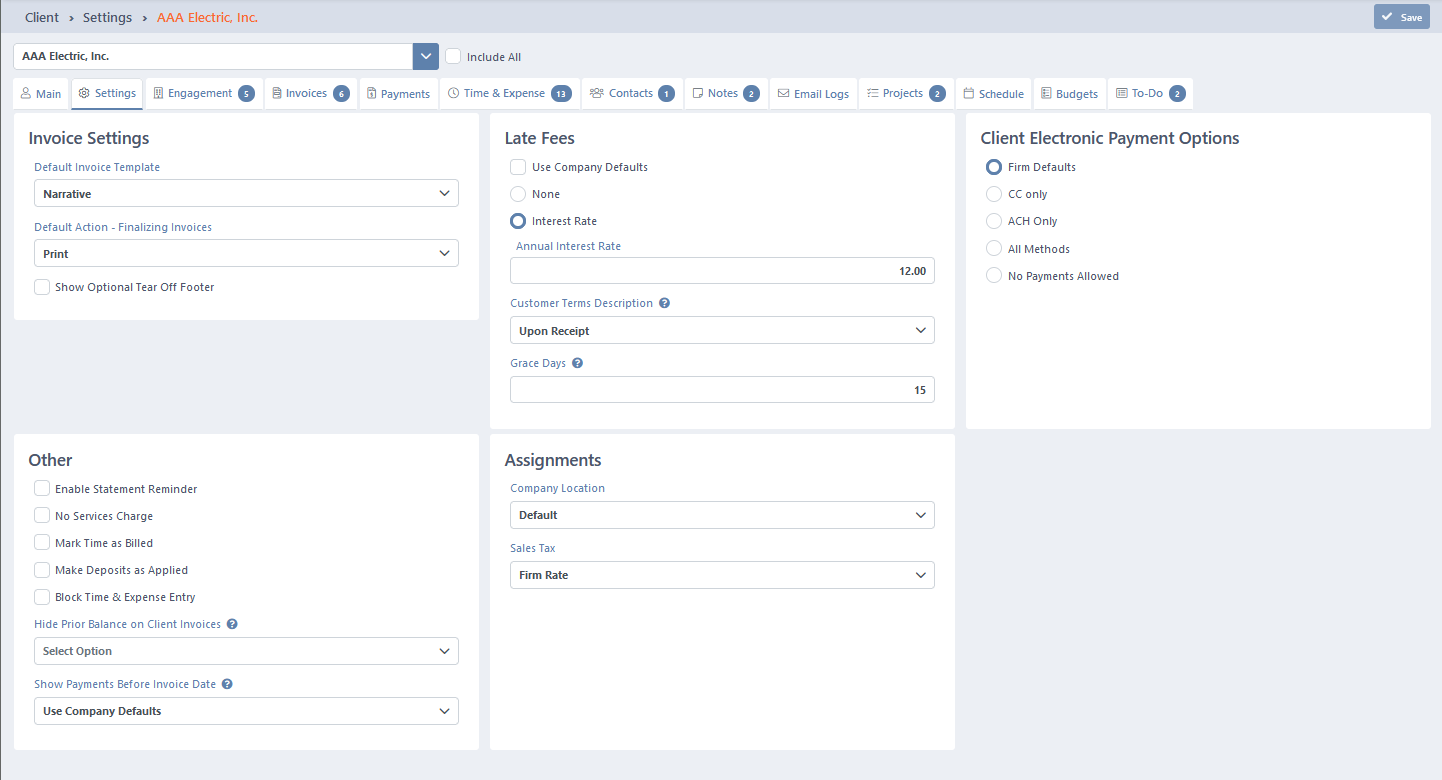
The ![]() Settings tab allows you to set Invoice Settings, Late Fees, Client Electronic Payment Options, Assignments, as well as Other options. At the top of the tab, the ✓ Save button is available to apply any changes.
Settings tab allows you to set Invoice Settings, Late Fees, Client Electronic Payment Options, Assignments, as well as Other options. At the top of the tab, the ✓ Save button is available to apply any changes.
The following fields are available:
Invoice Settings
- Default Invoice Template – Select the Invoice Type used for new invoices by default. Note that this option will be updated when changing the Invoice Type for a new invoice. For additional information, see the Invoicing Overview article.
- Default Action – Finalizing Invoices – Select whether the invoice will Print, Email, or Finalize Only when finalizing invoices for this client. Note that this option will be updated when changing the Action for a new invoice. For additional information, see the Invoicing Overview article.
- Show Optional Tear Off Footer – Select this check box to include a remit slip at the bottom of the invoice, allowing clients to fill out and return with their payment. Note that for credit card payments, we recommend accepting online payments using MangoPayments. For additional information, see the Electronic Payments articles.
Note that Invoice Settings can be changed when running invoices.
Late Fees
- Use Company Defaults – Select this check box to use the settings defined for late fees in General Settings. Clear this option to configure the late fee settings for this client separately. For additional information, see the Late Fees article.
- Select None to not charge late fees, or select Interest Rate to assess charges on unpaid invoices.
- Select the Annual Interest Rate (if calculating late fees), the Customer Terms Description (30 Days, 45 Days, or Upon Receipt), and the number of Grace Days before fees are assessed.
Client Electronic Payments
- Select Firm Defaults to use the electronic payment options defined in General Settings, select CC only to only accept credit and debit cards, select ACH Only to only accept electronic checks or bank debits, select All Methods to accept all payment methods, or select No Payments Allowed to not accept electronic payments for this client. For additional information, see the Electronic Payments article.
Other
- Enable Statement Reminder – This check box is only available if the Enable Statement Reminder check box is selected in General Settings on the Invoices Enabling Statement Reminder will automatically send an email to clients that have open invoices that are past due based on Terms and Interval.
- No Services Charge – Select this check box to prevent time and expense transactions from being billable for this client. Although they can be invoiced, they will all appear as non-chargeable.
- Mark Time as Billed – Select this check box to automatically mark time and expense transactions as billed for this client, so they will not show as Work-In-Progress (WIP) for billing purposes.
- Make Deposits as Applied – Select this check box to automatically attempt to apply deposits for this client to invoices, or clear this check box to default deposits as advance payments. For additional information, see the Deposits article.
- Block Time & Expense Entry – Select this check box to prevent time and expense records from being created for this client.
- Hide Prior Balance on Client Invoices – Select Use Company Defaults to hide the prior balance if the Hide Prior Balance on Client Invoices check box is selected on the Invoices tab of General Settings, or select Hide Prior Balance on Client Invoices to hide the prior balance regardless of the General Settings. If the company default is cleared, and the client is set to use the company default, the prior balance will be included on invoices.
- Show Payments Before Invoice Date – Select Use Company Defaults to include all payments received since the date of the last invoice if the Show Payments Before Invoice Date check box is selected on the
 Invoices tab of General Settings, or select Show Payments Before Invoice Date to include these payments regardless of the General Settings. If the company default is cleared, and the client is set to use the company default, payments will only be included on the invoice when they are dated on or after the invoice date.
Assignments
- Company Location – Optionally select a location. The Default location uses the information on the Company Settings tab of Company Information. Other locations can be defined on the Company Locations tab of Company Information. For additional information, see the Company Information article.
- Sales Tax – Select None to not assess sales tax, select Firm Rate to use the sales tax defined in General Settings, select Company Location Rate to use the sales tax for the selected Company Location defined in Company Information, or select Client Rate to configure sales tax for this client separately. For additional information, see the Time & Expense Settings and Company Information articles.
- If calculating a client rate, select the Sales Tax on Labor and Sales Tax on Expenses as a percentage.

Engagement Tab
The ![]() Engagement tab allows you to add, edit, and delete the engagements assigned to your client. For more information on Engagements, see the Engagement List article.
Engagement tab allows you to add, edit, and delete the engagements assigned to your client. For more information on Engagements, see the Engagement List article.

Invoices Tab
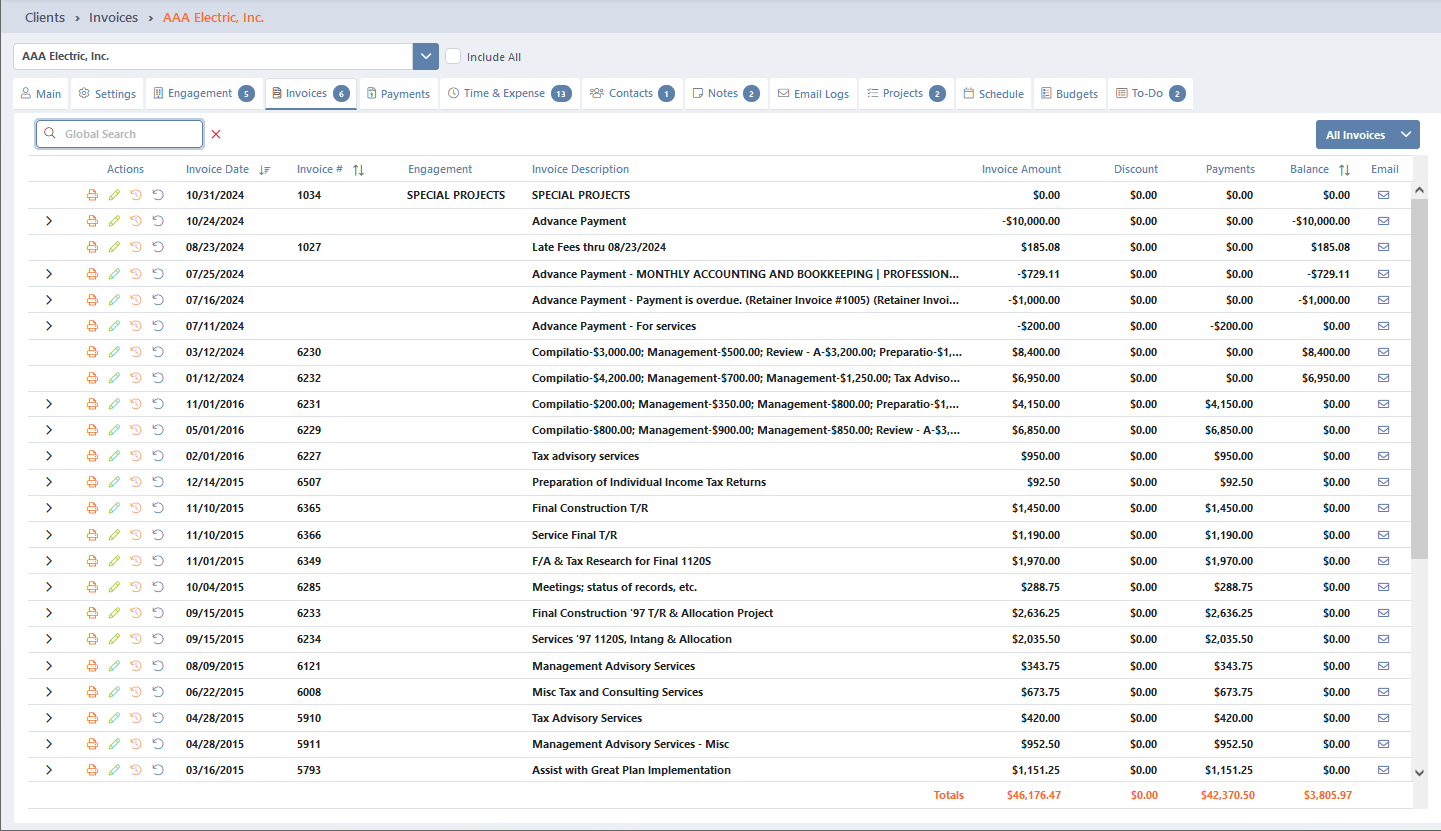
The ![]() Invoices tab lists all invoices that have been created. Invoices in orange are ones that are currently available in Invoice Review. For additional information, see the Invoicing Overview article.
Invoices tab lists all invoices that have been created. Invoices in orange are ones that are currently available in Invoice Review. For additional information, see the Invoicing Overview article.
The Global Search field can be used to locate records containing specific text. Once specified, an indicator will be displayed showing how many records contain that text. To clear the search, click the red X icon to the right of the field.
The Filter option allows you to view All Invoices, or to limit the list to only Open Items or Paid Invoices.
Click the ![]() (Show Payments) icon to see payments applied to the current invoice.
(Show Payments) icon to see payments applied to the current invoice.
The Actions column provides options to perform an action on a specific entry.
- Click the
 (Preview) icon to preview the invoice.
 - Click the
 (Edit) icon to edit the invoice.
 - Click the
 (Time Report) icon to download a Time History by Invoice report.
 - Click the
 (Reverse) icon to reverse the invoice and put the applicable time and expenses back into work in process.
Click ![]() (Email Invoice) to email the invoice to the contact(s) on file. Invoices that are in Invoice Review or are for advance payments cannot be emailed.
(Email Invoice) to email the invoice to the contact(s) on file. Invoices that are in Invoice Review or are for advance payments cannot be emailed.
Finally, totals are included below the list. This includes Invoice Amount, Discount, Payments, and Balance totals.

Payments Tab
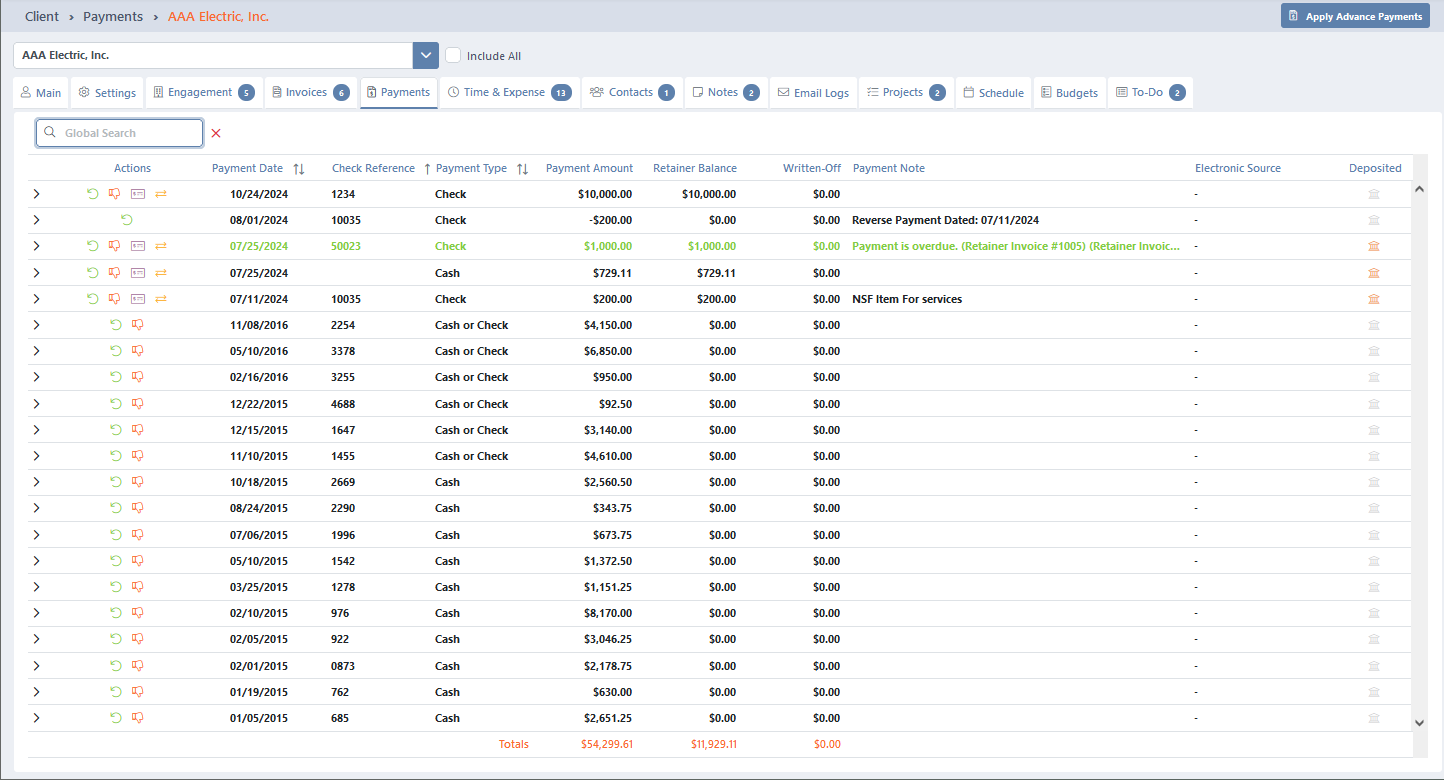
The ![]() Payments tab lists all payments received for the client.
Payments tab lists all payments received for the client.
At the top of this tab, the Apply Advance Payments button allows you to apply any existing advance payments to one or more statements.
The Global Search field can be used to locate records containing specific text. Once specified, an indicator will be displayed showing how many records contain that text. To clear the search, click the red X icon to the right of the field.
You can click on the header of Payment Date or Payment Type columns to sort the records shown by the values in that column. Click the header again to reverse the sort.
Click the ![]() (Payments Applied) icon to see invoices that this payment was applied to.
(Payments Applied) icon to see invoices that this payment was applied to.
The Actions column provides options to perform an action on a specific entry.
- Click the
 (Delete Payment) icon to delete the payment. You will be prompted to confirm the action.
 - Click the
 (Process Returned Item) icon to reverse the payment. This is useful in the case a check is returned to the client.
 - If a payment is an advance payment, click the
 (Refund / Debit Memo) icon to refund all or a portion of the payment, which allows you to enter a Description, or click the
  (Transfer Advance Payment) icon to transfer the advance payment to a different client.
Finally, totals are included below the list. This includes Payment Amount, Retainer Balance, and Written-Off totals.

Time & Expense Tab
The ![]() Time & Expense tab lists all time and expense records for the client that have not yet been billed. At the top of this tab, buttons are available to + Time or + Expense records.
Time & Expense tab lists all time and expense records for the client that have not yet been billed. At the top of this tab, buttons are available to + Time or + Expense records.
The Global Search field can be used to locate records containing specific text. Once specified, an indicator will be displayed showing how many records contain that text. To clear the search, click the red X icon to the right of the field.
You can click on the header of the Engagement column to sort the records shown by the values in that column. Click the header again to reverse the sort.
The Actions column provides options to perform an action on a specific entry.
- Click the
 (Edit) icon to open the Engagement Records window, allowing you to edit time and expenses for the selected engagement. Additional information about editing these transactions can be found in the Time Sheet Entry article.

Contacts Tab
Client Contacts can be added, edited, and deleted on the ![]() Contacts tab.
Contacts tab.
For more information on Client Contacts and the options on this tab, see the Client Contacts article.

Notes Tab
Notes can be added, edited, or deleted on the ![]() Notes tab.
Notes tab.
For more information on creating and editing notes, see the Client Notes article.

Email Logs Tab
The ![]() Email Logs tab includes a list of invoices emailed to clients.
Email Logs tab includes a list of invoices emailed to clients.
The Global Search field can be used to locate records containing specific text. Once specified, an indicator will be displayed showing how many records contain that text. To clear the search, click the red X icon to the right of the field.
You can filter the list by selecting a date range in the Date Options, or by specifying a Date From and Date To. Note that the date range cannot exceed 30 days.
You can click on the header of the Event or Date columns to sort the records shown by the values in that column. Click the header again to reverse the sort.
The Event column includes “Delivered,” “Opened,” or “Clicked” A line item for each event type, per emailed invoice, is shown with the date and time it was delivered, opened, or clicked in the Date column.

Projects Tab
The ![]() Projects tab allows you to add, edit, and manage projects assigned to your client.
Projects tab allows you to add, edit, and manage projects assigned to your client.
For more information on Projects, see the Overview of Project Management article.

Schedule Tab
The ![]() Schedule tab lists all events entered for the client via Scheduling.
Schedule tab lists all events entered for the client via Scheduling.
For more information on Client Schedules, see the Scheduling article.

Budgets Tab
Client Budgets can be added, edited, and deleted on the ![]() Budgets tab.
Budgets tab.
For more information on Client Budgets, see the Budgeting for Client Engagements article.

To-Do Tab
To-Do items can be added, edited, and deleted on the ![]() To-Do tab.
To-Do tab.
For more information on creating and editing To-Do items, see the To-Dos article.

Adding a Client
To add a new client:
- Open Clients.
- Click + New.
- Enter the applicable client information.
- Click ✓ Save.
Cloning a Client
To duplicate an existing client:
- Open Clients.
- Click
 Clone.
 - Select the new Client Name.
You will be prompted to clone customer contacts and addresses.
See It in Action
Common Questions About Clients
The following are some frequently asked questions about Clients in Mango.
- What client should be used to record time not billed to another client?
- It is recommended to set up your Company as a client. On the Settings tab of the Client View, select the Mark Time as Billed check box. For any time that is not billable to a client, you have the option to use the “General Office” activity to track time to your Company client, which will then not show as Work-In-Progress (WIP) for billing purposes.
- Will changing the Client Number and/or Group Billing options affect historical data?
- No, these will not affect anything shown to the customer. The Client Number is optional and is only used in the Customer table as a reference. The Billing Group and Client Group options are only used within Mango to select records. The only change you might notice are how these values are shown on reports. Grand totals will still be correct, but any totals based on group values may change compared to a previously run report.
- A former employee was made inactive; why do they still appear in dropdown lists?
- Staff will still appear in the originator list to allow firms to retain who brought in clients. They will not appear in other lists, such as Billing Parter or Manager.
- Can we create a sub-client to keep track of related clients?
- One way to indicate sub-clients is by using client groups. You can configure client groups on the Lists tab of General Settings. For additional information, see the List Settings article.
Learn More